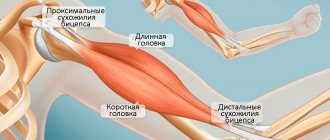
Why pump up your hand muscles?
For most athletes, grip strength is important. This is especially true for representatives of strength sports and wrestlers. A bodybuilder can argue with this statement, because pumping up his hands will not affect his appearance. However, this indicator is important not only in competitions, but also in everyday life.
One common myth is that grip strength is entirely dependent on the size of your forearms, but these indicators are not directly related. On the other hand, some exercises for the forearms do involve the muscles of the hands, but if you want to fully work them, you will need to include additional exercises in your training program.
You can pump up your hand muscles not only in the gym, but also at home. Some exercises do not require additional equipment at all, while other exercises require basic equipment, which most sports fans have at their disposal.
Holding strength training
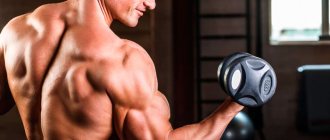
The holding force can only be developed in parallel with the compressive ability. The “tools” for training are dumbbells or a bar. With them, training that develops arm muscles will be more difficult, but more effective. They will “work out” the forearm and strengthen the hands.
- An exercise called “Farmer's Walk” is considered very effective. Despite the intriguing name, it looks uncomplicated and simple. A training person needs to take heavy dumbbells and “walk” around the gym with them. The “walk” is continued until a burning sensation appears in the shoulder area. There must be an interval of 5 days between workouts during which this exercise is performed.
- Hanging on four fingers. Using a horizontal bar, you need to hang on it, supporting your body weight on 4 fingers. The larger “brothers” do not participate in the training.
- To enhance the effect of training, the bar of the barbell is wrapped with a cloth or towel. And hold with 4 fingers on arms extended downwards. Such a homemade “expander” can lead to serious injury, so it is better to use special attachments for the bar.
Types of Grip Strength
To understand how to train your hand muscles and grip strength, let’s first figure out what grip strengths there are:
- Compressive. You can appreciate it with a handshake. Trains the compression grip mainly with the help of expanders.
- Holding. With this strength, you can hold objects for a long time. In sports, holding force is used, for example, during the stiff-legged deadlift exercise.
- Plucked. It is also called thumb strength. It allows you to hold an object between your thumb and index finger.
- Wrist strength. Take the chair by the leg and try to hold it with your straight arm. In this case you will feel your wrist strength. The strength of the entire forearm directly depends on it.
Compressive force training
The compressive force of the hand is clearly visible when shaking hands. An “iron” handshake indicates excellent compressive force. To develop this strength, exercises performed with an expander are effective. You can also use special rubber rings.
Begin classes with an expander or rubber ring, with the help of which no more than 10 compressions are done in one approach. More rigid devices are used a month after constant training.
Other exercises that develop compressive force include chopping wood. Residents of high-rise buildings can replace it by lifting a broom with their fingertips.
Exercises to work the muscles of the hands
Here are some simple and complex, but very effective exercises that will help you get into shape the muscles of your hands.
- Clench your hands tightly into fists and hold this position for 30 seconds. Repeat 2 times.
- Sit on a bench, rest your upper arm on your thigh, and take a lightly weighted dumbbell in your hand. Notice that the palm is facing up. Lift the dumbbell by bending and extending your wrist. Do 3 sets of 20 reps. Repeat the same, but with a palms down grip.
- Stand about 60 cm from the wall. Push up against the wall and then quickly push yourself away. Repeat 50 times. Over time, you can increase the load and perform the exercise on each arm separately.
Perform the exercises regularly to achieve results.
Warm-up for hands
Warm-up exercises for the hands play an important role in the overall training process. The overall effectiveness of training depends on the quality of their implementation. Before the main complex, you need to “warm up” well: hold your hands in hot water or do a light massage. If you skip this stage, after training you will experience severe pain in your muscles and joints.
- Clench your fists and make several circular movements.
- Place the hand clenched into a fist on the table. Take one finger out of your fist at a time. Make sure to keep the other fingers still during this process.
- Spread your straightened arms to the sides. Make several circular movements with your wrists in one direction and then in the other direction.
- Do wrist curls for 1 minute with each arm.
The time to perform the warm-up depends on the person’s level of preparedness. Most often it takes about 8-10 minutes.
Training with an expander
The advantage of training with expanders is that they involve not only the muscles of the hands, but also other muscles. To get the maximum effect, follow the rules for training with an expander. Start your workout with a light warm-up using a resistance band with a low level of rigidity. Repeat each exercise 5-15 times, unless otherwise indicated in the exercise description. Don't exercise every day! Give yourself time to recover. The optimal amount of training with an expander is 2-3 times a week.
Here are some simple exercises with this simple simulator:
- Squeeze and unclench the expander. Work for time (1-1.5 minutes - 1 approach) or for the number of repetitions (100 repetitions - 1 approach). Do 3-7 sets with 3-5 minutes rest between sets.
- Squeeze the expander all the way and hold it in this position for 3-5 minutes.
- Squeeze the expander all the way and unclench your fingers as slowly as possible.
How to combine exercises
There is no point in doing just one exercise. It is useless to pump up your brushes with just a rubber donut. Even the fist muscles require a comprehensive approach.
The list of exercises for training might look like this:
- Hanging on the horizontal bar.
- Wrist curls with a barbell.
- Expander.
You can change any element to the one you like best.
Now you know how to pump up your wrists using simple and understandable exercises. Train, achieve success, share your results!
How to choose an expander
There are 2 main types of hand expanders:
- Carpal expander in the shape of a circle (donut). It is made of dense rubber. The main advantages of such an expander are ease of use and accessibility. Disadvantage: it is impossible to adjust the stiffness. However, you can purchase several of these exercise machines with different levels of rigidity and gradually increase the effort.
2. Butterfly expander. It consists of 2 handles connected by a spring and vaguely resembles pliers. There are models on which you can adjust the stiffness. This is convenient, since one simulator is suitable for warming up and for a full workout.
Steel hand expanders stand apart. Among them there are models whose rigidity reaches 160 kg. These are exercise machines for advanced athletes; they are not suitable for beginners.
Here https://bear-grip.ru/category/sportivnye_tovary/torsion_carpal_expander/ you can find different expanders that will help you pump up your hand muscles and increase your grip strength.
Hitch
In order for the training to result in strong wrists and their components, after “special” gymnastics it is necessary to do a cool-down. With the help of this component of the training session, muscles relax, so there will be no soreness the next day.
- Extend your right arm straight so that your fingers hang freely. Grasp them with your left hand and “pull”, feeling the stretching of the muscles. Relax. Repeat the same movements, changing hands.
- Extend your straight arm forward. Leaving the hand itself motionless, slowly “turn” the hand to the side. The movement is performed until the tension in the muscles reaches a maximum. Repeat the movement with the other hand.
- Place the folded palms of both hands in front of your chest with your fingers pointing upward. Without lifting your hands from your chest, move your fingers down so that the hand radically changes its direction and they begin to “look” down.
- Place your hands behind your back and fold your palms there. Press them hard against each other. Put your hands down and relax.
All the exercises in this series are simple. They don't require any special effort. They can be used for rheumatoid arthritis to relieve stiffness and discomfort in the hand and its components.
Systematic exercises will gradually bear fruit: beautiful, strong and well-groomed hands will easily cope with a heavy load and even perform jewelry work with ease.
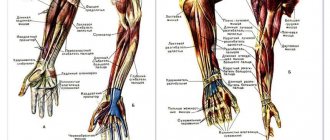
Finger training
Fingers also need attention. It is possible that your grip is quite strong, but your fingers are thin and weak. The main problem is that there are practically no muscles on the fingers, they are just tendons. As you know, developing tendons is much more difficult than muscles. However, if you show diligence, you can achieve success in this matter.
The ideal exercise to strengthen your fingers is finger push-ups. However, even if you know how to do push-ups correctly and a lot, do not try to immediately start doing push-ups on your fingers. They are really difficult and you can easily get injured.
To begin, stand in a plank position as you would for push-ups, but place one knee on the floor. Rise up onto your toes and gradually lift your knee off the floor. Try to hold this position for at least 5-10 seconds, gradually increase the time. If you feel pain or severe discomfort, do not force yourself, gently kneel down and shake your fingers.
Once you get used to the pose, try tightening your palms. And only after that move on to finger push-ups. Also increase the number of push-ups on your fingers gradually, do not do them every day, give your muscles a rest.
Basic and isolation exercises for triceps - photo
A short list of triceps exercises:
- Bench presses using a narrow grip in a lying position.
- Dips.
- French presses in a lying position with a negative bench angle.
- French presses in a standing or sitting position from behind the head.
- Extensions in a crossover simulator.
Regarding the bench press in point 1: it can be done on a Smith machine, as well as with the so-called negative bench angle (degree of inclination, see below). This will remove the chest and deltoids from the load, and it will be the triceps that will be loaded. This is a so-called isolating exercise - the load falls strictly on one muscle group or its area.
Dips on parallel bars Crossover extensions French bench presses
Close grip presses
Imitation-situational:
- Power wrestling wrist grab - the task is to grab the opponent's wrists. being in a fighting stance and trying to hold them. In this case, you can use only the strength of your arms and work with your hand and fingers, without resorting to using your body weight, legs, etc. At the same time, the opponent tries to free himself from the grip in a similar way and grab your wrists. You can also practice with two opponents at the same time, with each hand fighting a different opponent.
- Lifting the boxing bag with the phalanges of the fingers. The point is to try to grab the bag with your phalanges of fingers from a fighting stance, as if “pinching” it, and try to lift it as high as possible.
- “Crocodile” - everything is simple here, you need to cling as tightly as possible to the kimono (or other combat suit) of your sparring partner. Your partner should drag you around the mats quite a bit, trying to shake you off. Your task is to hold on.
Rehabilitation and training of hands and fingers. Strengthening your grip
Restoring and training your hands and fingers is an important part of strength training, neglect of which will come back to haunt you in adulthood. Developing performance (increasing muscle mass) or strength using modern methods is a traumatic activity. Many training systems do not take into account the fact that the forearms and hands and fingers are also a muscle group that needs to be developed. Other methods overload the forearms, as a result of which not only health suffers, but also the entire training system as a whole. Restoration and training of hands and fingers is one of the “blank spots” in the modern iron world. Today we will tell you how to strengthen your hands, and what to do if your hands or fingers need recovery. Let's break our conversation into several sections:
- 1. Exercises for the hands.
- 2. Special exercise machines for fingers and hands.
- 3. Training of hands and fingers. Principles of program construction.
- 4. Training of hands and fingers. Training schemes.
- 5. Restoration of hands and fingers.
Exercises for hands
Exercises No. 1. Squeezing the wrist expander
Goal: development of forearms, increase in grip strength, restoration and training of hands and arms.
Step by step technique:
Step 1
Step 2
Explanation: the wrist expander is the most convenient exercise machine for the fingers and hands. Not all expanders are capable of building muscle mass and strengthening the hands. Pictured is the Captains of Crush expander, which will become your eternal assistant not only in strengthening your hands, but also in building muscular forearms. Increasing the number of approaches and repetitions, constantly increasing the resistance of the expander is a method that will allow you to build powerful hands without additional training.
Exercise No. 2. Farmer's Walk
Goal: increase muscle mass in the forearms, arms and legs. Increase in testosterone levels.
Technique: Place two dumbbells (kettlebells, barbells) next to the outside of both feet. Sit down, arch your back. Straighten up with the weight. Take small steps forward. When turning, we reduce the step distance. It is better not to throw the projectile on the floor - this loads the lower back, shoulder and elbow joints. Squat down with your back straight and place the dumbbells on the floor when you decide to finish the set. Note: Choose a weight that you can “walk” with for no more than 25 seconds if you want to build muscle mass and develop forearm strength. Use a weight that you can “walk” with for 45–90 seconds if your goal is to build wrist endurance or lose weight.
Exercise No. 3. Hanging on a thick horizontal bar
Goal: restoration and training of hands and fingers, pumping up forearms, increasing grip strength. Improving posture, training the back muscles, reducing pain in the lower back, increasing height for boys and girls under the age of 25.
Technique: put a bar extender on the horizontal bar or wrap it with two towels. Set the timer for 30-40 seconds, jump up, grab the handles of the horizontal bar with an overhand grip. We hang on outstretched arms for 30–40 seconds or as long as you can hang. Explanation: It is better to use a neck extender. It's safer than two towels and more effective. But if you don’t have the funds to buy an expander, then a towel on the horizontal bar is much better than a thin bar. Addition: hanging on a thick horizontal bar is the most useful exercise for training your hands. Attach a bar at home, buy a bar extender, and make hanging on the bar a key movement in your training program.
Exercise No. 4. Deadlift with a thick bar
Goal: training hands and fingers, pumping up forearms. Gain muscle mass throughout the body.
Technique:
Photo 1. Back straight, inhale forcefully
Photo 2. Don't lift your head up. Fully straighten your legs and back. As you exhale, we return to the starting position. We don’t throw the barbell on the floor
Clarification: Not all hand exercises can be performed by beginners. The deadlift is one of the most dangerous movements in bodybuilding, but the effectiveness of the deadlift should force you to learn proper technique. Alternate between heavy weight deadlifts for 2-6 reps and this wrist exercise for 15-20 reps.
Addition: use a neck extender. A towel is a bad option, as it will constantly slide off the bar.
Exercise No. 5. Push-ups on fingers
Goal: training hands and fingers. Improving grip and poking strikes. Development of pectorals, triceps and deltoids.
Technique:
As you inhale, bend your arms at the elbow joint. Keep your fingers tense. Under no circumstances should you relax your fingers or allow them to bend. You may get injured, and the effectiveness of this exercise for the hands and fingers will be significantly reduced.
As you exhale, smoothly, without sudden movements, we return to the starting position. It is better not to fully extend your arms.
Explanation: if you can’t do push-ups on your fingers even once, do push-ups on your fists. Below we will provide a program for a smooth transition from “fist” to “finger” push-ups.
Special exercise equipment for fingers and hands
Twist Yo' Wrist hand and finger trainer
One of the best exercise machines for pumping up the forearms, developing and strengthening the hand and fingers. The main advantage of the Twist Yo' Wrist is the atypical load on the forearms. The simulator engages the arm muscles at a unique angle that cannot be replicated with a barbell, dumbbells or expander.
Hand Yoga Finger Trainer
The unique Korean simulator is useful not only for increasing finger strength, but also for recovering from injuries, as well as for preventing some diseases of modern civilization. Hand Yoga is a finger simulator that is vital for office workers whose income is related to typing. An eight-hour load on the fingers and hands is atypical for humans from an evolutionary point of view. The muscles atrophy, resulting in pain in the arms. The person can no longer perform his or her job duties. If you know how to do push-ups on your fingers 10–12 times in 5 approaches, you can save money on this simulator. If you have not yet become a guru in finger push-ups, the Hand Yoga finger trainer will become your assistant in strengthening your muscles and improving your health.
Eagle Loops Finger Trainer
One of the simplest special finger trainers. Eagle Loops are loops that can be attached to a pull-up bar, barbell or dumbbell. With this simulator you will be able to hold and bend/extend your fingers with any weight. You can master finger pull-ups, which not only work your fingers, but also improve the mind-muscle connection in your back, biceps, and deltoids.
Sotsky Bison-1M simulator
The best exercise machine for the hands. Sotsky's Bison-1M simulator is used not only at the amateur, but also at the professional level. His work is admired by Olympic champions, wrestlers, scientists, sports officials and ordinary amateurs. Sotsky’s simulator is indispensable for wrestlers and representatives of striking martial arts. Incredibly useful in arm wrestling and other strength sports.
Finger exerciser Finger expander “IMTUG”
The finger expander “IMTUG” is the choice of amateurs who want to increase the strength of their fingers, strengthen them, and improve the health of their fingers, but do not put “finger” training at the forefront. It is a reliable, safe and cost-effective choice.
Powerball finger and hand trainer with counter
Powerball with a counter is the choice of athletes who want to not only strengthen their hands and fingers, but also enjoy training. Powerball with a counter allows you to constantly compete with yourself, as well as challenge your friends, colleagues and family. This is not only useful, but also a fun exercise for developing hands and fingers.
Hand and finger training. Principles of program construction
Restoration and training of hands and fingers is based on two principles:
1. The principle of load progression. 2. The principle of supercompensation.
Let's look at the principles of training hands and fingers in more detail.
Progression of loads
This is the principle that underlies all sports. Training your hands and fingers is only effective if you constantly increase your training load.
You are doing your first training session. The muscles get a load, become toned and grow. After a few days, the body adapts to the resulting stress. The body will create the muscle reserve that is needed to painlessly complete the previous (!) workout. If in the next lesson you do not do a little more work than in the previous one, there will be no new stress. The body has nothing to adapt to, there is no need to create muscle reserves. Most amateurs have been marking time in one place for years. Don’t repeat their mistakes, follow the principle of progression of loads.
Super compensation
This is one of the training phases in which you need to train. Let us highlight four phases of the training process:
1. Traumatization. 2. Recovery. 3. Supercompensation. 4. Loss of super compensation.
The first phase is training. During training, muscle cells are injured, which triggers subsequent phases. Important: muscles do not grow during training! During training, muscles are destroyed! Excessively frequent training is a vicious cycle of injury-recovery-injury-recovery. You simply do not reach supercompensation, in which the body creates the necessary muscle reserve. Such training is meaningless and harms your body.
Recovery begins immediately after completion of the workout and lasts until the muscle fibers are completely restored.
If the injury has been sufficient, the body creates a muscle reserve, which we call supercompensation.
A missed workout during the supercompensation phase results in loss of supercompensation. The consequence is a return to pre-training levels.
The speed of recovery and the onset of supercompensation are individual parameters that can only be calculated independently. There is only one recommendation that works 100%: do not exercise if you have muscle pain or discomfort. Do not hesitate to train after the disappearance of pain and “heaviness” in the muscles.
Hand and finger training. Training schemes
Step-by-step training program:
Workouts No. 1-2
| Exercise | Approaches | Repetitions | Rest between sets in seconds | Rest between sets in minutes |
| Push-ups | 3 | 8 | 60 | 3 |
| Hanging on a horizontal bar with an expander | 3 | 30 seconds | 60 | 3 |
| Farmer's Walk | 3 | 15 seconds | 60 | — |
Workouts No. 3-4
| Exercise | Approaches | Repetitions | Rest between sets in seconds | Rest between sets in minutes |
| Push-ups | 4 | 8 | 60 | 3 |
| Hanging on a horizontal bar with an expander | 4 | 30 seconds | 60 | 3 |
| Farmer's Walk | 4 | 15 seconds | 60 | — |
Workouts No. 5-6
| Exercise | Approaches | Repetitions | Rest between sets in seconds | Rest between sets in minutes |
| Push-ups | 5 | 8 | 60 | 3 |
| Hanging on a horizontal bar with an expander | 5 | 30 seconds | 60 | 3 |
| Farmer's Walk | 5 | 15 seconds | 60 | — |
Workouts No. 7-8
| Exercise | Approaches | Repetitions | Rest between sets in seconds | Rest between sets in minutes |
| Push-ups | 5 | 8 | 60 | 3 |
| Hanging on a horizontal bar with an expander | 5 | 30 seconds | 60 | 3 |
| Farmer's Walk | 5 | 15 seconds | 60 | 3 |
| Push-ups on fingers | 2 | 4 | 90 | — |
Workouts No. 9-10
| Exercise | Approaches | Repetitions | Rest between sets in seconds | Rest between sets in minutes |
| Push-ups | 5 | 8 | 60 | 3 |
| Hanging on a horizontal bar with an expander | 5 | 30 seconds | 60 | 3 |
| Farmer's Walk | 5 | 15 seconds | 60 | 3 |
| Push-ups on fingers | 3 | 5 | 90 | — |
Workouts No. 11-12
| Exercise | Approaches | Repetitions | Rest between sets in seconds | Rest between sets in minutes |
| Push-ups | 5 | 8 | 60 | 3 |
| Hanging on a horizontal bar with an expander | 5 | 30 seconds | 60 | 3 |
| Farmer's Walk | 5 | 15 seconds | 60 | 3 |
| Push-ups on fingers | 4 | 6 | 90 | — |
Workouts No. 13-14
| Exercise | Approaches | Repetitions | Rest between sets in seconds | Rest between sets in minutes |
| Push-ups | 5 | 8 | 60 | 3 |
| Hanging on a horizontal bar with an expander | 5 | 30 seconds | 60 | 3 |
| Farmer's Walk | 5 | 15 seconds | 60 | 3 |
| Push-ups on fingers | 4 | 8 | 90 | — |
Workouts No. 15-16
| Exercise | Approaches | Repetitions | Rest between sets in seconds | Rest between sets in minutes |
| Push-ups | 5 | 8 | 60 | 3 |
| Hanging on a horizontal bar with an expander | 5 | 30 seconds | 60 | 3 |
| Farmer's Walk | 5 | 15 seconds | 60 | 3 |
| Push-ups on fingers | 4 | 8 | 90 | 3 |
| Squeezing a finger expander | 3 | 10 | 45 | — |
Workouts No. 17-18
| Exercise | Approaches | Repetitions | Rest between sets in seconds | Rest between sets in minutes |
| Push-ups | 5 | 10 | 60 | 3 |
| Hanging on a horizontal bar with an expander | 5 | 35 seconds | 60 | 3 |
| Farmer's Walk | 5 | 20 seconds | 60 | 3 |
| Push-ups on fingers | 4 | 10 | 90 | 3 |
| Squeezing a finger expander | 3 | 10 | 45 | — |
Workouts No. 19-20
| Exercise | Approaches | Repetitions | Rest between sets in seconds | Rest between sets in minutes |
| Push-ups | 5 | 10 | 60 | 3 |
| Hanging on a horizontal bar with an expander | 5 | 35 seconds | 60 | 3 |
| Farmer's Walk | 5 | 20 seconds | 60 | 3 |
| Push-ups on fingers | 5 | 10 | 90 | 3 |
| Squeezing a finger expander | 5 | 10 | 45 | — |
Workouts No. 21-22
| Exercise | Approaches | Repetitions | Rest between sets in seconds | Rest between sets in minutes |
| Push-ups | 5 | 10 | 60 | 3 |
| Hanging on a horizontal bar with an expander | 5 | 35 seconds | 60 | 3 |
| Farmer's Walk | 5 | 20 seconds | 60 | 3 |
| Push-ups on fingers | 5 | 10 | 90 | 3 |
| Squeezing a finger expander | 5 | 10 | 45 | 3 |
| Powerball | 3 | To the limit | 60 | — |
Workouts No. 23-24
| Exercise | Approaches | Repetitions | Rest between sets in seconds | Rest between sets in minutes |
| Push-ups | 5 | 10 | 60 | 3 |
| Hanging on a horizontal bar with an expander | 5 | 35 seconds | 60 | 3 |
| Farmer's Walk | 5 | 20 seconds | 60 | 3 |
| Push-ups on fingers | 5 | 10 | 90 | 3 |
| Squeezing a finger expander | 5 | 10 | 45 | 3 |
| Powerball | 5 | To the limit | 60 | — |
Workouts No. 25-26
| Exercise | Approaches | Repetitions | Rest between sets in seconds | Rest between sets in minutes |
| Push-ups | 5 | 10 | 60 | 3 |
| Hanging on a horizontal bar with an expander | 5 | 35 seconds | 60 | 3 |
| Farmer's Walk | 5 | 20 seconds | 60 | 3 |
| Push-ups on fingers | 5 | 10 | 90 | 3 |
| Squeezing a finger expander | 5 | 10 | 45 | 3 |
| Powerball | 5 | To the limit | 60 | 3 |
| Deadlift | 2 | 6 | 90 | — |
Workouts No. 27-28
| Exercise | Approaches | Repetitions | Rest between sets in seconds | Rest between sets in minutes |
| Push-ups | 5 | 10 | 60 | 3 |
| Hanging on a horizontal bar with an expander | 5 | 35 seconds | 60 | 3 |
| Farmer's Walk | 5 | 20 seconds | 60 | 3 |
| Push-ups on fingers | 5 | 10 | 90 | 3 |
| Squeezing a finger expander | 5 | 10 | 45 | 3 |
| Powerball | 5 | To the limit | 60 | 3 |
| Deadlift | 4 | 6 | 90 | — |
Workouts No. 29-30
| Exercise | Approaches | Repetitions | Rest between sets in seconds | Rest between sets in minutes |
| Push-ups | 5 | 10 | 60 | 3 |
| Hanging on a horizontal bar with an expander | 5 | 35 seconds | 60 | 3 |
| Farmer's Walk | 5 | 20 seconds | 60 | 3 |
| Push-ups on fingers | 5 | 12 | 90 | 3 |
| Squeezing a finger expander | 5 | 10 | 45 | 3 |
| Powerball | 5 | To the limit | 60 | 3 |
| Deadlift | 5 | 8 | 90 | — |
Workouts No. 31-32
| Exercise | Approaches | Repetitions | Rest between sets in seconds | Rest between sets in minutes |
| Push-ups | 5 | 12 | 60 | 3 |
| Hanging on a horizontal bar with an expander | 5 | 40 seconds | 60 | 3 |
| Farmer's Walk | 5 | 25 seconds | 60 | 3 |
| Push-ups on fingers | 5 | 13 | 90 | 3 |
| Squeezing a finger expander | 5 | 12 | 45 | 3 |
| Powerball | 5 | To the limit | 60 | 3 |
| Deadlift | 5 | 10 | 90 | — |
Workouts No. 33-34
| Exercise | Approaches | Repetitions | Rest between sets in seconds | Rest between sets in minutes |
| Push-ups | 5 | 15 | 60 | 3 |
| Hanging on a horizontal bar with an expander | 5 | 40 seconds | 60 | 3 |
| Farmer's Walk | 5 | 25 seconds | 60 | 3 |
| Push-ups on fingers | 5 | 14 | 90 | 3 |
| Squeezing a finger expander | 5 | 15 | 45 | 3 |
| Powerball | 5 | To the limit | 60 | 3 |
| Deadlift | 5 | 12 | 90 | — |
Workouts No. 35-36
| Exercise | Approaches | Repetitions | Rest between sets in seconds | Rest between sets in minutes |
| Push-ups | 5 | 15 | 60 | 3 |
| Hanging on a horizontal bar with an expander | 5 | 40 seconds | 60 | 3 |
| Farmer's Walk | 5 | 25 seconds | 60 | 3 |
| Push-ups on fingers | 5 | 14 | 90 | 3 |
| Squeezing a finger expander | 5 | 15 | 45 | 3 |
| Powerball | 5 | To the limit | 60 | 3 |
| Deadlift | 5 | 12 | 90 | 3 |
| Hand Yoga | 3 | 15 | 45 | — |
Workouts No. 37-38
| Exercise | Approaches | Repetitions | Rest between sets in seconds | Rest between sets in minutes |
| Push-ups | 5 | 15 | 60 | 3 |
| Hanging on a horizontal bar with an expander | 5 | 40 seconds | 60 | 3 |
| Farmer's Walk | 5 | 25 seconds | 60 | 3 |
| Push-ups on fingers | 5 | 14 | 90 | 3 |
| Squeezing a finger expander | 5 | 15 | 45 | 3 |
| Powerball | 5 | To the limit | 60 | 3 |
| Deadlift | 5 | 12 | 90 | 3 |
| Hand Yoga | 5 | 15 | 45 | — |
Workouts No. 39-40
| Exercise | Approaches | Repetitions | Rest between sets in seconds | Rest between sets in minutes |
| Push-ups | 6 | 15 | 60 | 3 |
| Hanging on a horizontal bar with an expander | 5 | 45 seconds | 60 | 3 |
| Farmer's Walk | 6 | 25 seconds | 60 | 3 |
| Push-ups on fingers | 5 | 15 | 90 | 3 |
| Squeezing a finger expander | 5 | 20 | 45 | 3 |
| Powerball | 5 | To the limit | 45 | 3 |
| Deadlift | 5 | 12 | 90 | 3 |
| Hand Yoga | 5 | 15 | 45 | — |
This is your program for the first 4-6 months. Instead of sets and reps, you can add weight to some exercises. This will not be a mistake, and will only speed up the training of your hands and fingers.
Restoration of hands and fingers
This is an individual process that needs to be agreed upon with your doctor. There cannot be “one size fits all” recommendations here - depending on the nature, duration and stage of healing of the injury, recovery and training of the hands and fingers may look completely different.
In the later stages of injury treatment (only in consultation with a doctor), recovery of the hands and fingers can be accelerated by a gel expander. All the exercise machines we talked about above are also suitable for rehabilitation work. But in case of serious changes in bone tissue (fractures, cracks), the resistance of the simulator should be as low as possible.
Recovery of hands and fingers can be accelerated with the help of creams and ointments. We present the most effective drugs:
1. Indovazin (Troxevasin). Relieves inflammation, helps with dislocations, sprains and ligament damage.
2. Traumeel, sir. Restores soft tissues. Helps with bruises, cuts and contusions. Relieves pain at the site of application.
3. Rescuer. Significantly accelerates tissue regeneration. Abrasions, cuts, cuts, palms rubbed into blood - indications for the use of “Rescuer”.
4. Mirralgin. Helps with hematomas and any skin damage. Used as a prophylactic agent to improve the condition of skin that may be subject to trauma.