Tips and tricks
Below we give some tips and recommendations on the technique of performing hanging lower limb lifts, which will help to avoid gross mistakes and wasted efforts for beginners and to perform the exercise efficiently for those whose sports training is at an average and higher level.
Basic mistakes of newbies
Beginners tend to make the following mistakes that should be avoided:
- strong swaying of the body and lifting of the lower limbs by inertia - when done this way, the exercise will bring absolutely no benefit;
- relaxation of the muscles of the shoulder girdle;
- helping with hands;
- improper breathing.
To avoid swinging, you need to learn to lower your legs smoothly and pause when they reach the lowest point.
About the features of the exercise and common mistakes:
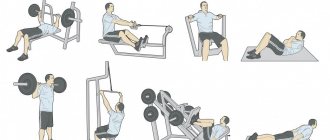
Execution Features
When performing the exercise, you can use straps to secure your hands on the bar and elbow clamps. They will help you focus only on your abdominal muscles. The hands are not used during execution; they are relaxed and are used only for gripping. For maximum load on the oblique abdominal muscles, it is necessary to twist the body left and right - this is done with bent knees, which turn in different directions, rising each time. When lifting your legs, you need to tuck your pelvis - this will allow you to maximally tense your abdominal muscles. Inertia is unacceptable when performing this exercise. The ankle should rise and fall at each segment of the amplitude in the same amount of time. The lowering of the lower limbs should not be carried out completely - they should stop at the level of 15-25°. This way the abdominal muscles will remain tense throughout the entire exercise. It is not recommended to attach additional weights to your shins. The legs are a normal load to achieve the desired result. The chest must be kept open. If you feel pain in the lower back, you need to spread your toes and knees, while leaving your heels closed to each other. This should be more comfortable. If you cannot stabilize your body, you can ask a partner or instructor to hold you from behind. You need to look straight ahead. The chin resting on the chest is undesirable. At the end point of lifting your legs and after fixing them for two seconds, you need to additionally tense your abs. For beginners, it will be easier to do lifts of the lower extremities in a vertical position on the Swedish wall or parallel bars with a vertical back. The smaller the angle between the body and the hips, the greater the load on the abs. Raising your legs only parallel to the floor does not give any results to the abdominal muscles
It should be above an angle of 90°. A reverse grip on the bar is not recommended. The main attention should be paid not to raising the lower limbs, but to lowering them.
Execution technique
Don't try to keep your legs straight. It is necessary that your knees are slightly bent. This is done to avoid injury to the knee joints. If it is difficult for you to raise your legs straight, then raise your legs in a position where they are bent at the knees to an angle of approximately 90 degrees. Over time, when your muscles get stronger, you can gradually straighten your legs and then do the exercise with straight legs.
And if you didn’t have enough time for the third approach, then either do as much as you can, or supplement with the exercise “Lifting legs while lying on the floor,” on a bench, on any machine on which you can perform leg lifts while lying down. Breathing is the same as when lifting your legs while lying down, that is, when lifting your legs up, you need to exhale, and when lowering, inhale.
Leg raises can be performed hanging on a wall bars or on any other machine. This can be either an inclined board or any machine designed to perform this exercise.
Sets and reps
The principle of selecting the number of approaches and repetitions in these approaches remains as follows: in the first approach, you perform such a number of repetitions as to load your muscles to 60 or 70% of their maximum capabilities.
In the second approach, perform as many repetitions as possible. Well, in the third - how it turns out. In the future, you try to gradually increase the number of repetitions in all approaches. At least one repetition in one or even several classes. Then, when your muscles are strong enough, you can use weights.
Exercise technique
After jumping, you need to grab the bar. If you cannot reach it, you should use a stand or small bench. The main thing is not to touch the floor with your feet while hanging on straight arms. Use special straps if you have a weak grip. Straighten your arms completely, bend your back slightly at the waist. Exhale. You need to hold your breath, tense your abs, and try to raise your legs as high as possible, bending them at the knees. For sufficient stress on the abs, raise your knees above your waist.
At the top point, tighten your abdominal muscles as much as possible and hold in this position for 1-2 seconds. Exhale and lower your legs to the starting position, relaxing a little. After a short pause, repeat the exercise.
After fully mastering the technique, you can complicate the exercise: perform straight leg raises. At the same time, the load will increase both on the hip flexor muscles and on the lower part of the abs.
Recommendations
Start learning the exercise by lifting your legs, while bending them at the knees. But as you gain experience, do the exercise at a more advanced level - raise your legs while fixing the angle at your knees. Don't be embarrassed by the fact that this exercise works your hip flexors, as they are involved in all abdominal exercises. It is simply impossible to ensure that the load goes only to the abdominal muscles, without using the hip flexor muscles!
The legs in this exercise play the role of a lever, the length of which sets the level of load. To increase the load, you just need to straighten your legs more. If your quadriceps are strong enough and your hamstrings are elastic (stretch well), then to engage your abdominal muscles you will need to raise your knees much higher than your waist.
Wide head grip
Another common and quite popular variation of this exercise. The main nuance that you should remember when performing this version of pull-ups is that it is quite traumatic. Risk arises from incorrect execution. If the shoulder joints remain immobile, a very serious injury can occur. The load falls on the same muscle groups as when pulling with a wide grip to the chest, but the latissimus dorsi muscles are worked the most.
The width of the grip is similar to that of the bench press. When doing this exercise, you should under no circumstances bend your back. The body and legs should form an even, single line. The elbows must be kept pointing downwards at all times. They shouldn't look back. At the highest point, the neck should not come into contact with the surface of the crossbar.
Until the full range of movement is achieved, you need to spend a certain amount of time training. This allows you to master the correct technique. If you try to do a pull-up right away, you may get injured. A signal to stop further movement is pain in the back or shoulder joints. You can't stop moving suddenly. It is necessary to slowly lower to the starting position. This will avoid injury or minimize damage.
How to do it right
Drop Set is a technique used in strength training and bodybuilding. In the first phase of the exercise, the heaviest weight is used to gradually lower it. When doing a pull-up, the athlete clamps and holds a heavy dumbbell or kettlebell between his legs. This technique is aimed at maximizing muscle growth.
The following approaches to the horizontal bar are used in it:
- The first is to use the heaviest weight, for example 13–13.5 kg, with which the athlete gets tired after 4–6 repetitions and stops performing.
- Second - the weight is reduced by 2.5 kg, after which you need to do 8-10 pull-ups.
- Third - the weight is reduced by another two and a half kilos and 10-12 repetitions are done.
- The fourth is another weight reduction of 2.5 kg and another 12–15 repetitions.
- Fifth - here the weight is reduced at the discretion of the athlete (options: 2.5 kg or 5 kg), 15-20 pull-ups are performed. In the fifth approach, it is not necessary to adhere to the specified number of repetitions, but can be performed as many as the athlete is able to do.
There are many different types of pull-ups. You can place your hands close to each other on the bar, or create a wider grip. The wider the distance between the palms, the more the back muscles will work. For those who want a V-shaped back, it's best to work with a wide grip on each set.
We recommend learning how to properly perform negative pull-ups, as well as wide, parallel and reverse grip pull-ups.
The way you grip the bar will also affect which muscles are used.
Gripping with the palms facing away from the athlete is a pull-up involving the back muscles, and performing with the palms facing the person doing the exercise involves the biceps. Neither of these methods is better than the other, they are simply two different exercises that use a slightly different way to move different muscle groups when lifting body weight.
Important! Control your movements so that they are slow and smooth throughout the session. Let's look directly at the technique of pull-ups on the horizontal bar; it can be performed both with the use of weights of various weights and configurations, and without them:
Let's look directly at the technique of pull-ups on the horizontal bar; it can be performed both with the use of weights of various weights and configurations, and without them:
- Grab the bar with your hands, palms forward, with the space between your palms slightly wider than your shoulder width.
- Keep your legs slightly bent, kneecaps as close as possible.
- Concentrate on your back muscles and feel them contract as your arms lift your body up. There is no need to tuck your chin over the bar.
- When you pull yourself up, fix your position for a few seconds at the highest point of the lift, pressing your stomach against the bar.
- Pull yourself up slowly, mentally, slowly, counting to three, then freeze, squeezing your back muscles, then also slowly lower yourself to the count of three.
- Between reps, hang slightly from the bar, looking down and relaxing to allow your back muscles to move away from your shoulder blades and return to their rightful place.
As with other exercises, there are some errors in the pull-up that need to be addressed to make it safe and effective, including:
- Partial range of motion - the full length of the muscle needs to be developed, so always work from full extension at the elbow until your chin passes the bar.
- Lack of control when lowering - lowering the body down is as important as pulling it up, so after lifting the athlete should not allow the body to fall sharply down, so as not to injure the shoulder girdle.
- Jerky movements - do not use additional jerks, jumps or push-ups to pull yourself up, this can lead to strain in the muscles of the shoulders and back.
Did you know? Strength training equipment appeared in Europe and America in the sixties of the last century, but their demand increased in the 1970s, along with the fashion for bodybuilding and the popularity of bodybuilder Arnold Schwarzenegger.
Pull-ups
General rules
1. Hold the bar firmly. Use a medium overhand grip: your hands grab the bar at shoulder level.
2. Avoid sudden movements or jerks. It’s better to do it once smoothly than three times with a jerk.
3. Each pull-up consists of 4 phases:
- Climbing (35% of the time)
- Fixation (15%)
- Descent (35%)
- Pause (15%)
3. When rising, your gaze should be directed upward to the sky or ceiling. The chin is slightly raised. It's like you're pulling yourself up to the bar with your chest.
4. At the top point, the chin should be above the bar.
5. Avoid slow lifting and sudden lowering. When lowering, you should, just as when lifting, use your muscles and not give in to the force of gravity. Lowering and rising should be the same in speed and duration.
6. Exhale - while lifting and fixing over the bar, inhale - during descent and pause.
7. Ideally, lifting is done without swinging or using the legs. At the initial level, you can close your eyes to this point.
Scheme of pull-ups on the horizontal bar from scratch
0. To start, simply hang from the bar.
Bend your back, look up at the bar and the sky (ceiling). Feel your body in this position.
1. First day
Our beginner pull-up program starts with simulating pull-ups.
Grabbing the bar, try to lift your body a little, pause a little and lower yourself down. The lowering is equal in time to the ascent and occurs smoothly. The essence of the simulation is to provide an opportunity to correctly perform a minimal pull-up without concentrating on achieving the goal. We monitor breathing, body position, direction of gaze and execution technique.
2. First week
During the first week, our pull-up routine from scratch involves the use of a chair or the assistance of a partner.
We do full pull-ups, but with partial weight. For this purpose we use, for example, a stool, chair or any other elevation. The point is that part of the weight falls on the auxiliary object. To do this, you need to bend your legs at the knees and rest on an auxiliary object with your fingers or lifting your legs. The same function can be performed by a partner who will hold the legs at the shin or ankle.
As part of this stage of the program for beginners on pull-ups on the horizontal bar, we train daily or every other day. We perform 5-8 repetitions in 3 approaches.
3. Second week
Our zero bar pull up program in week two focuses on half pull ups or learning how to lower properly.
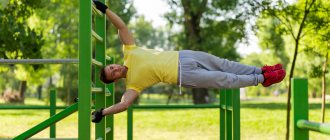
The half pull-up is also known as the negative pull-up. We can call it negative because Pull-ups like this don’t happen: we train not to drop sharply.
Holding the bar with our hands and pushing off the ground with our feet, we assume a position as if we had pulled ourselves up. We fixate: the chin is above the bar, the gaze is directed upward, the chest almost touches the bar. Then we lower ourselves smoothly.
We perform 5-8 negative pull-ups in 3 approaches.
4. Third week
In the third week of the pull-up scheme on the horizontal bar from scratch, we alternate exercises with the help of an auxiliary object or a partner and a negative version. If pull-ups are easy, increase the number of repetitions to 15-20.
It shouldn't be easy. It must be a load that can be overcome with effort.
The more perfect you are at doing light pull-ups in week three, the more successful you will be at doing full pull-ups.
5. Fourth week. Full pull-ups.
The previous three weeks of the beginner's pull-up program were necessary for the body to get used to physical activity and “understand” in which direction it needs to adjust. For a person who starts pull-ups on the horizontal bar from scratch, the issue of physiological adjustment is extremely important. After all, instead of sitting, you are going to build muscle mass. For our body, this is a completely different way of working.
Follow the general rules for pull-ups that we gave above.
Alternate between forward and reverse grips every day. Don't do them together in the same workout.
Start with the maximum number of pull-ups you can do. 3 pull-ups is very good. Do 3 approaches. It's okay if on the third approach you only do 1 pull-up. As soon as the number of repetitions in the first and last set is equal, add 1 extra repetition. Continuing the program from zero pull-ups on the horizontal bar, over time your muscles will get stronger, and the number of repetitions will increase to 5, 10, 15, 20.
Tips for training on the horizontal bar
If you've been following the above programs but haven't noticed any significant changes in your fitness, don't get discouraged. These guidelines will help you reach your full potential.
Technical nuances
Keep an eye on your technique. When performing pull-ups on the bar, focus the load on the back muscles, not on the arms. To better feel the contraction and stretching of the latissimus muscles, use wrist straps. Try to lower your shoulders a little, this way you will “free up” the trapezius and rhomboid muscles, and your back will receive more load. If your grip is the weakest link in your chain, pay more attention to your hang on the bar. You can use additional weights by hanging a weight or disk on a chain from your belt. Another option is to use a towel. Hanging on it perfectly develops the strength of the forearms. You can also wrap a towel around the bar to make it wider - this will strengthen your hands and increase finger strength. It is recommended to use magnesium, this will make holding the horizontal bar much more comfortable, and your grip is unlikely to let you down. Extinguish the force of inertia. Do not deceive yourself - each repetition must be performed under control. They should all be “clean”; you shouldn’t squirm your whole body to pull yourself up. There is no point in this. It is better to do fewer repetitions, but technically correct, the benefits will be much greater. Try to maintain a consistent pace of exercise. This will make it easier to use the neuromuscular connection and focus on stretching and contracting the muscles. This applies to all exercises performed with your own weight.
However, this does not mean that the faster the better. If you are still a beginner and the training program we have indicated is difficult for you, pay attention to practicing auxiliary exercises. Do back exercises on blocks in the gym - this way you will become stronger and pull-ups will be much easier
Another option is to use a partner's help. Let him push you up a little while doing pull-ups, thereby making the task easier. After some time, you will be able to safely do pull-ups on your own. The third option is to do partial pull-ups. Over time, you will understand the biomechanics of movement and will be able to easily overcome sticking points and perform pull-ups at full amplitude. The last option is pull-ups in a gravitron. This is an excellent machine that helps you do pull-ups using a counterweight, the resistance of which can be changed as your strength increases. Watch your diet. It is not enough for muscles to stimulate growth through strength training; they need resources for recovery and subsequent hypertrophy. Therefore, a calorie surplus, sufficient protein intake (about 2 g per kg of weight) and complex carbohydrates (from 4 g per kg) are necessary.
Safety of the training process
- Be careful when performing head pull-ups. Many athletes do not have enough flexibility to fully perform this exercise, which causes damage to the joints and ligaments of the shoulder. Roughly the same story is associated with two similar exercises: the barbell overhead press and the vertical block row behind the head.
- If you feel discomfort while performing any exercise, give it up. It is better to replace this element with something more comfortable, but with a load on similar muscle groups.
- Don't forget to do a thorough joint warm-up before training. Pull-ups, muscle-ups, and hanging leg raises involve almost all the muscles of the core, so the warm-up should be appropriate. Thoroughly stretch your wrists and rotator cuff to minimize the risk of injury. Do several sets of forward bends to properly stretch your lower back. Don't be afraid to spend 10-15 minutes warming up - your muscles, joints and ligaments will thank you for it.
And in conclusion, one more important piece of advice: decide on your individual training frequency. You should not train every day, bringing your body to exhaustion and exhaustion. This is fraught not only with overtraining, but also with injuries. 3-4 sessions per week will be enough to achieve any sports goals.
Author Ivan Tungusov
Project expert. Training experience - 12 years. A good theoretical basis on the training process and proper nutrition, which I am happy to put into practice. Need a recommendation? This is for me