Hatha yoga is the optimal practice for those who want to learn to feel their body, control it and maintain it in the desired shape.
Before learning the basic yoga poses on your own, we recommend subscribing and watching our free video lessons on the basics of yoga. Since hatha yoga consists of bodily and breathing practice, great attention at this stage is paid specifically to asanas - poses that must be taken to stretch and strengthen the muscles. Initially, you should remember just a couple of simple rules:
- The asana should be mastered from the simplest variations;
- When performing the exercise, slight discomfort or tension is possible, but not severe pain;
- You should change one asana to another smoothly, avoiding sudden movements;
- Breathing should be smooth and calm, unless otherwise provided by the rules for performing a particular pose.
You need to take care of the place of practice in advance: find an elastic and soft mat, choose light clothing that does not restrict movement, and eliminate any distractions. After a short warm-up, you can begin to master asanas: from simple to very complex.
Simple standing asanas
Tadasana
Tadasana is one of the easiest and most basic poses in hatha yoga . It is performed as simply as possible: legs are close, the weight of the body falls on the middle of the feet. It is necessary to tighten your stomach, tighten your buttocks and straighten your chest. It is important not to strain your neck or raise your shoulders. The gaze is straight, hands down, fingers together. You should breathe calmly throughout the entire asana - 30 seconds. This pose improves posture and relieves fatigue from the nervous system.
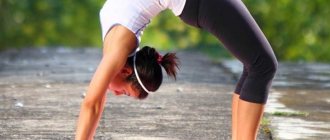
Padangustasana
Padangustasana (forward bend), exit from Tadasana. As you exhale, you need to gradually lower your straight spine forward until it is parallel to the floor. Hold for a couple of seconds, then lower even lower, reaching your toes. If stretching at this stage does not allow you to perform Padungastasana in full amplitude, then you need to linger for 15-20 seconds in the position that is now permissible.
Asanas: basic recommendations
Before you start practicing asanas, you should consider various guidelines to improve the effectiveness of your practice. First of all, you should understand that our physical body is one of our shells, and it is the grossest. We also have an energy body, on which the main impact will be made. The practice of asanas leads to an increase in energy levels, which in turn can lead to unpredictable results. For example, if there is any addiction, then this addiction can intensify until it is completely impossible to control it. On the other hand, with the help of asanas you can also get rid of this addiction. Therefore, in this case, everything is individual, and you should exercise common sense and monitor your condition so that the asanas do not do more harm than good. To increase efficiency and avoid harming yourself by practicing asanas, you should follow the following recommendations:
1. The best time to perform asanas is early in the morning. The energy around you is more positive at this time. The ideal time to practice is before sunrise. The efficiency of execution at this time increases significantly. But you shouldn’t get attached to the time of day.
2. With regular practice of asanas, it is recommended to adhere to a certain diet. First of all, meat products should be excluded, as they cause serious harm at the level of the physical body, energy body and even at the level of consciousness. It is also recommended to abstain from foods that greatly stiffen the body and greatly slow down progress in practice.
This is salt, sugar, flour, fatty, fried. It is recommended to exclude mucus-forming foods - potatoes, dairy products, baked goods. It is recommended to increase the amount of raw plant foods in the diet to 70%, this will keep the body clean and provide energy. With this diet, flexibility and stretching will improve much faster as you progress in asana practice.
3. Try to keep track of where you spend your energy. Sometimes you can notice that after practicing asanas, your bad habits begin to take hold of you even more, and if before you ate one cake, now you start eating four, you used to watch one episode of your favorite TV series before bed, and now you watch two. This happens precisely because the energy level increases, and this energy merges even more into habitual addictions. In this case, you should either reduce your practice or learn to redirect your energy to something more positive. Try to plan in advance, before practice, what you will do after practicing asanas. It is desirable that this be some kind of objectively useful matter. It’s even better if it will be useful not only to you, but also to those around you. If, after practicing asanas, you indulge in idle time and entertainment to an even greater extent than before you began to practice yoga, then there is no more sense in such a practice than trying to carry water in a sieve. Energy levels will increase, and addictions will only intensify.
4. Try to create proper motivation. If your motivation is not strong enough, your yoga practice will end after the first difficulties or a period of stagnation in it, which happens quite often. If you started doing yoga to improve your health and solve some problems with it, then think about how you can use such an effective tool as yoga when your illness goes away and your health improves. In fact, health is the least that can be achieved in yoga. The opportunities for a diligent practitioner are simply sky-high, and if you have decent motivation, you can achieve much more than just absolute health.
5. It is advisable not to shower for 1-2 hours after practice. The practice of asanas allowed you to accumulate energy, and the water will take all this energy for itself. Therefore, if there is such an opportunity, then it is better to take a shower a couple of hours after practice, and the first time after it is better to use it as efficiently as possible for some useful activities in order to effectively invest the accumulated energy.
6. Try not to stop at any one set of asanas - always bring something new into your practice. If you perform the same asanas for a long time, then most likely there will be stagnation in your development, since you will be working through the same energy channels and working with the same qualities of your personality. This will lead to the fact that some qualities will be hypertrophied, and some will not be developed at all. It is also recommended to focus your attention on performing those asanas that are the hardest. This means that there are some problems in certain energy channels and they need to be worked out first.
7. It should be noted that the practice of asanas should contain an element of asceticism. If while in the asana you feel a pleasant relaxed state, then the effect of this practice is small. It is important to understand that this is not about constantly twisting yourself into a knot and enduring hellish pain, this is also an extreme. But there should be slight discomfort (and perhaps sometimes you can afford not so slight discomfort). Because it is discomfort that allows you to work out some internal problems by influencing the physical body and clearing energy channels. In fact, any problem in our body and mind is a blockage of one or another energy channel. And in order to cleanse it and send energy through it, certain efforts must be made, which always occur through a certain feeling of discomfort.
8. To prevent the practice of asanas from taking place according to the “one step forward and two steps back” principle, it is recommended to limit the negative information and energy impact on your consciousness as much as possible. We are not talking, of course, about going into the forest and becoming a hermit - such a yoga practice will also not make sense. But stop watching TV, listen to destructive music (which is the vast majority of people now), limit communication with those people who, according to your subjective observations, negatively influence you. We are not talking about stopping communication with all friends and acquaintances, but if you see that after communicating with this or that person you feel depressed or exhausted, then most likely you are simply “feeding” him with the energy that accumulated during practice. How reasonable and beneficial this is for both of you is up to you to decide.
These are the basic recommendations, the observance of which will allow you to increase the effectiveness of your practice and not go astray when some difficulties appear, and they will certainly appear. Because development is always overcoming oneself. Only degradation can be easy and pleasant. And everyone makes their own choice about where to move. But experience shows that everything “easy and pleasant” ultimately does not lead to anything good. And those who make efforts to develop themselves begin to live more effectively both for themselves and for those around them. What prospects does the practice of asanas open to us?
Advanced standing poses
Utthita Trikonasana
Utthita Trikonasana is performed in triangle pose . While in Tadasana, you need to use a jump to change your position so that your legs are wider than your shoulders and your arms are directed to the sides. Gradually, you should turn your feet to the right side and lean to the right so that your left hand is on the outside of the foot. The gaze should be directed to the thumb of the right hand. It is important that a straight line should run from the left hand to the right. Be sure to repeat the asana on the left side.
Utthita Trikonasana II
Utthita Trikonasana II is performed from the same starting position - legs apart, arms to the sides . But you should lean straight forward. After reaching parallel with the floor, you need to point your right hand down and rest on your palm. Then raise your left hand up, directing your gaze after it. It is important to maintain a straight line with your arms and not round your back.
Warrior Poses: Maximum Difficulty
Virabhadrasana I
Virabhadrasana I in hatha yoga is also performed from Tadasana . You need to raise your arms up, and then clasp your palms above your head. The legs diverge by 120-130 cm, which from the outside resembles a classic lunge. The angle between the knee should be straight, and the right thigh should be parallel to the floor. The left foot can be slightly turned to the right. The face, chest and knee should be turned in the direction of the right foot. The head is thrown back and the gaze is directed upward.
Virabhadrasana I
Virabhadrasana II is very similar to variation I, but the arms are not raised upward, but are directed to the sides . From Tadasana you need to stand in a stance with your feet wider than your shoulders. Then turn your feet to the left and lower your left knee until your thigh is parallel to the floor. The body remains straight, but the gaze is directed behind the left hand - to the left. Palms face down. It is important to maintain a straight back, keep your stomach and buttocks toned.
Virabhadrasana III
Yoga also includes Virabhadrasana III, which is achieved from Virabhadrasana I. To perform the exercise, you need to lower your chest onto the thigh of your front leg so that your arms are parallel to the floor. Then gradually lift your left leg off the floor, transferring the weight to your right. The knee of the supporting leg must be slowly extended until the leg becomes straight. It is enough to hold the pose for 30 seconds. When performing warrior pose, you need to repeat the exercise on both sides.
Subtleties of Virabhadrasana
It is easier to maintain balance in the warrior pose if the weight is evenly distributed on the feet. Taking the third position, you can imagine how something stretches the body by the arms and leg, which is suspended. If lower back pain prevents you from performing the asana, then you need to practice the exercise in a lighter version, resting your hands on your knee or floor.
The warrior pose in any variation strengthens the muscles of the abdominal cavity and hips, helps to establish balance and make the lower back more resistant to stress. Joint mobility also develops, which is useful for those who are interested in different types of physical activity. Virabhadrasana strengthens the hamstring muscles and allows for faster recovery from joint injuries.
What does a yoga complex consist of?
- Warm-up (joint gymnastics, several circles of Surya Namaskar) “launches” all body systems, prepares muscles and joints for practice. Standing asanas strengthen the legs, tone the muscles, and work the lower chakras.
- Standing balances improve concentration and tune the mind to contemplative practice.
- Hand balances strengthen your arms and enhance your concentration practice.
- Seated asanas work on all areas of spinal mobility, strengthen the abs, and promote muscle stretching.
- Positions to open the thoracic region fill the Anahata chakra with energy and increase the mobility of the thoracic spine.
- Positions to open the hip joints help to master meditative asanas and are a good prevention of joint diseases.
- Inversion exercises increase venous drainage from the lower extremities and also move energy to higher energy centers.
- Shavasana relaxes, calms, removes mental blocks, and allows you to feel inner sensations.
Balances
Asana “Chair” - Utkatasana
One of the simplest balances in yoga is chair pose . While in Tadasana, you need to raise your arms above your head and then slowly lower your pelvis back, bending your knees. With your knees bent at an obtuse angle, your body should be tilted forward, reaching for your arms. This is the final part of the exercise, in which you need to stay for up to 40 seconds.
In general, yoga and balances develop a sense of balance, teach you to concentrate and relax even in poses that are uncomfortable for the body. In addition, performing balances on one leg develops muscles and helps strengthen the muscle corset. It is easiest to balance when your gaze is directed at a stationary point below. The most difficult option is to be in balance with your eyes closed. An intermediate step can be looking straight ahead.
Classic balances on one leg
Vrksasana 1
Vrikshasana, otherwise called tree pose in hatha yoga, has two variations . To perform the first, you need to take Tadasana and pull your leg bent at the knee towards your stomach. The supporting foot should point strictly forward, and the knee should remain straight. Grasping the knee of your working leg, you should maintain the pose for up to 30-40 seconds. Exercise has a beneficial effect on the knee joint, coordination and bowel function.
Vrikshasana 2
A more complex variation of Vrikshasana is performed from the same starting position . But now the working leg should be turned to the side and, lifting it up, pull the foot as close to the perineum as possible. If your leg slips off the inner thigh, you can support it with your hand. Otherwise, straight arms are raised up and palms are closed. The asana is performed on both sides. It is preferable to start with the leg that is worse at maintaining balance.
Complex balances on one leg
Utthita Hasta Padagushthasana 1
Utthita Hasta Padagushthasana begins with Tadasana . The right leg, as in Vrikshasana I, needs to be pulled towards you, clasping the big toe with your hands. As you exhale, you should gradually straighten your knee. The supporting leg should also remain straight. During execution, it is important to keep your abs tight and your back straight. But you should not round your lower back, so as not to harm your back. A detailed description of the pose allows you to perform it as correctly as possible.
Utthita Hasta Padagushthasana 2
Utthita Hasta Padagushthasana II is also performed, but before performing it, the hip joint should be opened . The leg is straightened not in front of you, but as far as possible to the side. If you can't maintain balance, you can straighten your opposite arm. If it is still difficult, then you can rest your foot against the wall, but you should raise your arms above your head. There is another problem in developing a pose - stretching does not allow you to straighten your leg. It is worth using straps, a towel to grab the foot, or hold the foot with both hands, but under the kneecap.
Balances on hands
To increase arm strength, you need to regularly perform push-ups. In hatha yoga, women often practice push-ups on their knees. After the strength of the hands is already sufficiently developed, you can begin asanas.
Bakasana – crane pose
Bakasana is known as crane pose . First you need to squat down and place your palms on the floor in front of you. Gradually shifting the weight of the body onto your arms, you should raise your pelvis, spread your knees to the sides and place your shins behind your shoulders. Then you need to carefully tear off one foot. When this becomes easy, it’s time to transfer the weight completely to your arms and lift both legs off the floor. The middle of the back needs to be pulled up, the pelvis behind the back, and the legs behind the pelvis. You can complicate the task if you try to straighten your arms at the elbows.
Chaturanga Dandasana
Chaturanga Dandasana is another easy arm balance variation that is worth doing to increase strength . The starting position is the well-known plank. Then the arms need to be bent so that the forearms are parallel to the floor and the whole body is a straight line. If it is difficult to maintain this position, the knees drop to the floor.
Hatha Yoga: Asanas
Asanas are static poses that are held for a certain time in order to allow the energy in the body to be redistributed. This formulation contains the key word - “redistribution”. By taking a certain pose (asana), you close one channel or several, redirecting energy through other channels that remain open at that time. This explains the reason why it is so important to hold a pose and not rush to change it to another. You need to give the energy time to distribute.
The transition from one asana to another can be accomplished through ligament movements, but this is not necessary, since the asanas were not originally conceived as a series of exercises for developing the physical body or physical education. They are ideal poses for spiritual practice, and many of them can be used for meditation or self-absorption.
Hatha yoga: types of asanas
In hatha yoga there are a large number of asanas, a kind of encyclopedia of yogic poses. But in order to understand the whole variety, they can be divided into several groups:
- standing;
- sitting;
- lying down;
- deflections;
- bends;
- twisting;
- balancing;
- inverted.
Also, all asanas can be divided according to other criteria. Some are aimed at endurance and strength, while others focus on stretching.
For example, Hanumanasana is a typical stretching pose from a sitting position, while crane pose (Bakasana) or peacock pose (Mayurasana) are strength poses.
All inverted poses are distinguished by the fact that they stimulate blood supply to the brain, since in this position the blood rushes to the head, and this has a positive effect on brain function. In almost all asanas of this type, the work of the digestive organs is stimulated and the internal organs are toned.
For example, here we can highlight the well-known halasana (Plow Pose), shoulder stand (Salamba Sarvangasana).
Crunches are very beneficial for back and abdominal health. Among the most famous, we highlight the inverted triangle pose (Parivrita Trikonasana), the eye of a needle pose (Suchirandhasana), Ardha Matsyendrasana (Pose of the Lord of the Fishes), Supta Matsyendrasana.
Balance asanas are generally universal. By correctly compiling a complex of asanas of only this type, you can strengthen almost all muscle groups and improve the functioning of internal organs, not to mention coordination; With regular exercise, you will not notice how even poses performed on one leg will become completely familiar to you. Here are just a few examples of “balancing” asanas: Garudasana, Anantasana, Natarajasana and, of course, Salamba Shirshasana.
We will look at other groups of asanas in more detail in the next section.
Practice and everything will come
Patabhi Jois
Standing forward bends
Adho Mukha Svanasana (Downward Facing Dog)
Adho Mukha Svanasana is otherwise known as downward-facing dog . The pose begins with Tadasana and subsequent Padangustasana. Then you need to take steps back one by one until the maximum tension in your legs. It is important that your knees remain straight. The feet need to be slightly turned out. Thus, the arms and back form an upward straight line, and the legs form a downward line. A tucked stomach and an upward direction of the tailbone will make the pose correct in execution.
Prasarita Padattonasana 1
Prasarita Padattonasana 2
Prasarita Padattonasana involves the same inclination as Padangustasana, but with a wide stance . So, you need to stand in Tadasana, jump with your legs wider than your shoulders, turn your heels a little outward and bend your straight back forward. If stretching allows, then you need to clasp your ankles with your hands. Otherwise, yoga does not tolerate pain: you need to bend your arms at the elbows and place your hands on your forearms to make it easier, and in this position, stretch down. This pose is needed to stretch the legs and spine.
Simple sitting poses
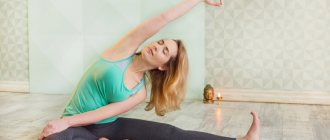
Sukhasana and Stambhasana
Sukhasana is one of the simplest exercises in yoga . It is easy to perform: you need to cross your legs in front of you and stretch your arms upward with straight arms. After doing several breathing cycles, you can lower your arms, relax for a while and repeat the asana, changing the cross of your legs. Stambhasana is a slightly more complicated version. You need to not just cross your legs, but put one shin on top of the other, pressing your lower leg as much as possible to the floor. Hands should be placed on your knees. An ideal pose for performing mantras and meditation.
Virasana, Padmasana and Gomukhasana
Virasana is performed in this way: you need to kneel, legs slightly wider than shoulders . Hands should be placed on your knees. Then you need to slowly lower your pelvis between your feet, keeping your back straight. Padmasana is performed similarly to Sukhasana , but the legs are not simply crossed, but placed as close to the groin as possible. Gomukhasana – cow head pose . To begin, you need to sit up straight and slide your right foot under your left knee. The left thigh should be placed on the right shin, and the left shin should be placed next to the right thigh. Raise your right hand up and, bending it at the elbow, clasp it with your left hand. You need to keep your back straight.
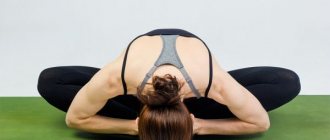
Badhakanasana and Badha Padmasana
Badhakanasana is a seated butterfly pose . You need to sit up straight, feet together, knees pointing to the side. You can help your knees with your hands and, with light pressure, press them to the floor if stretching allows. Badha Padmasana is a more complicated version : you need to cross your legs, as in Stambhasana, and reach your feet behind your back with opposite hands.
Sitting twists
Marichiasana
Marichiasana is a pose named after the Indian sage . To repeat the pose, you need to sit up straight with your legs straight. Then pull your left leg towards you and grab it with your left hand from the inside, twisting to the right. Stay in this position for a short time, then lower yourself onto a straight leg with a straight back, stretching your chin over your knee. This pose is held for up to one minute. Twists are easier to perform if you see the pose clearly depicted in pictures.
Marichiasana II
Marichiasana II is performed from the same starting position , but this time the thigh of the bent leg is grabbed by the opposite hand from the outside, and the hands are clasped behind the back.
When performing breathing cycles, you need to twist more and more to the side as you exhale and maintain the position while inhaling. Since Marichiasana can be difficult for a beginner, you can simplify it a little: in the first version, do not grab with your hands, but rest them on the floor, and in the second, grab your straight leg with your hand. After twisting in one direction, you should repeat the exercise in the other.
Bends while sitting
Paschimottanasana
Paschimottanasana is known to everyone who has ever done stretching . Starting position – straight back and straight legs extended forward. While inhaling, you should stretch your arms up, and as you exhale, smoothly lower them forward, grabbing your feet. It is important to keep your back straight, stretching it from vertebra to vertebra. With each exhalation you should go a little lower. At the same time, we must not forget about straight knees and a straight back: you need to lower yourself to your feet first of all with your lower abdomen. The position is held for 30-40 seconds at the lowest possible angle.
Janu Sirsasana
Janu Shirshasana resembles the previous asana, but in practice it is easier to perform . From the starting position (sitting with your legs extended), you need to pull your right leg towards you, moving your knee to the side, and resting your foot on your thigh. Then, as you inhale, stretch up, and as you exhale, lower yourself forward, grabbing the foot of your straight leg with your hands. Here you need to pay attention to stretching: you cannot overcome severe pain, because the acceptable discomfort should be barely noticeable. Gradually, with every minute you spend in the pose, it will become easier and easier to perform the correct bend with a straight back. After performing it on the right leg, you should repeat the exercise on the left leg.
Three difficulty levels of Navasana
Navasana
Navasana is otherwise known as boat pose . To perform it, you need to sit with a straight back and grab your hamstrings with your hands. After this, while maintaining balance, you need to lift your feet off the floor and move your legs up so that your shins are parallel to the floor. Your arms should also be straightened next to your legs, stretching forward behind them. When it becomes easy to maintain this position, you need to lightly rest your hands on the floor and straighten your legs. It is important to ensure that the lower abdomen does not move away from the hips and that the back remains straight.
Navasana III
The third level of difficulty in Navasana involves straightening your arms until they are parallel to the floor . Balance should be maintained while performing the pose. Moreover, the support should be on the sit bones, and not the tailbone. Beginners may not raise their legs too high, but those whose body allows for a more difficult version should press their hips as much as possible into their lower abdomen, leaving their back perpendicular to the floor. After performing Navasana, you should relax your body in Sukhasana.
Basic lying poses
Shavasana
Savasana is included in the easiest and most famous asanas in yoga . Corpse pose usually ends a hatha yoga class - you need to lie on your back, arms at a comfortable distance from the body, muscles relaxed, and eyes closed. However, in the middle of the class you should practice other asanas that are performed lying down.
Supta Padangusthasana
The simplest of them is Supta Padangushthasana . In a lying position, you need to pull your knee to your stomach and clasp your foot with your hands. As you exhale, the leg straightens, the heel looks clearly upward. After holding this position, you need to release one hand and move your leg to the side, keeping the knee straight. The gaze is directed in the direction opposite to the leg. If there is insufficient stretch, a belt is used.
Matsiasana
Matsiasana is a pose that develops spinal flexibility . In a lying position, legs together, you need to rest your elbows on the floor, gradually lifting your back off the floor. In this case, the top of the head does not come off the surface, but the weight of the body is transferred not to the head, but to the elbows and feet. With each exhalation you need to open your chest more and more and stretch your back up. Even if the backbends have a detailed description, it is better to do them under the supervision of an instructor so as not to harm the spine.
Lying twist
The first lying twists are performed as follows : you need to lie on your back, pull your knee, clasping it with your hands, and then lower it to the floor near the opposite leg. The arms are directed to the sides, and the head is turned in the direction opposite to the knee. You can stay in this position for a few minutes, after which you should change legs. It is important that the buttocks, lower back and shoulders should not come off the mat.
Simple inverted poses
Usually, inverted poses are left for the end of the class, because the body is already warmed up and the risk of injury is minimal. At the end of the lesson, a person will have maximum control of the body and control the muscles, making it easier to master more complex hatha yoga asanas. In general, inverted poses are beneficial for the human body. They help you relax after a working day and gain energy if performed in the morning.
Sarvangasana
Mastering inverted poses should begin with Sarvangasana - candle pose . To perform it, lie on your back and press your thighs to your stomach. After several rolls on your back, you need to lower your palms to your lower back and gradually straighten your legs up, resting on your elbows and upper back. The neck should be maximally unloaded throughout the entire asana - one minute.
Halasana
From Sarvangasana, advanced yogis move to Halasana - plow pose . Straightened legs should be lowered behind the head and arms extended behind the back. In this case, the fingers should be intertwined with each other and turned outward. Again, the main load should fall on the shoulder joints, and not on the neck. The back should be kept straight. You can also take Halasana from a lying position with your knees pressed to your chest. After performing several rolls, you need to move your legs behind your head and straighten them. At first, your feet can rest against the wall, eventually falling lower and lower.
Moments of mastering the handstand
For example, it is impossible to teach a person with long legs to do a handstand in the same way as a short-legged master does, because when they lower their hands to the floor, their tailbone will be in a different position.
In general, handstand is a very interesting pose. I’ve been mastering it for about five years now with varying success and have come to the conclusion that, as many masters as we have standing on our hands, there are as many ways to achieve this position. Everyone comes up with their own method, based on their strengths and weaknesses. Therefore, it is better to master this pose without unnecessary outside advice, based on the capabilities of your body and personal experience.
Those who do the pose well can even confuse you with a large number of nuances that become relevant not at the first stage of mastering this asana. If you want to hear useful advice and get real help in mastering the handstand, it’s better to talk to someone who has recently learned how to do this pose. Some of those who confidently stand on their hands sometimes do not even understand that this is not a completely natural pose for a person.
But whatever the proportions of our body, no matter how deeply we bend or bend, the main thing is the desire for inner peace of mind, which is achieved through observation. Be an attentive and detached witness to what happens to you while performing asanas.
Hatha yoga is a method based on the comprehension of one’s Highest Reality through the gross physical body. Having mastered the gross shell, you need to move on to Pranayama, Pratyahara, Dhyana, etc., and not demonstrate your achievements at yoga sports parties.
Headstand
Salamba Sirsasana
Salamba Shirshasana is performed in hatha yoga, but requires the presence of an instructor . You can also master it on your own, but only after long training and after achieving a high level of physical fitness. To begin with, you should kneel and elbows, clasping the latter with your hands. Then release your hands and interlace your fingers. Place your head on the floor and straighten your legs at the knees, resting only on your toes and elbows. Stretching your tailbone up, you need to bring your feet closer to your head, pressing your hips to your stomach.
When this position becomes easy, you can move on to the next stage - lift your legs off the floor and press them bent to your body. The shoulders go as far away from the head as possible, and the main emphasis is on the elbows. Over time, this stage becomes more complicated - the legs can be straightened at the knees, pointing them upward. At first, it is enough to maintain this position for just a few breathing cycles. Over time, the headstand can be extended to 7-10 minutes. You can learn Salamba Shirshasana against a wall - this will greatly facilitate the process.
Nuances of mastering deflections
Exiting the bridge to a standing position is easier for someone who has long arms and legs. It is important that the instructor can adequately assess the student’s capabilities. With a long body and short limbs, you need to achieve a good deflection, and then master the exit from the bridge, but if the student has long limbs, then you can push him to master this exit with a less deep deflection.
An interesting situation arises with Viparita Chakrasana - a very useful dynamic combination proposed by Iyengar in his famous book “Yoga Dipika”. Conducting classes in intensive groups, I noticed that this ligament is mastered much faster by people with long limbs.
The transition from bridge to handstand is easy due to the long lever. For such people, Viparita Chakrkasana helps improve the regular Urdhva Dhanurasana. For people with excellent arching (some can even do a bridge by grabbing the feet) and short arms and legs, Viparita Chakrasana causes difficulties.
In order to feel this connection, it makes sense for such people to first master a similar transition through Shirshasana or Pinchamayurasana. With long legs and arms, on the contrary, it is easier to first learn how to transition through a handstand, and then through a headstand and forearms. Thus, depending on the proportions of the body, the hierarchy of complexity of these dynamic ligaments changes.
Sun Salutation – Moon Salutation
Surya Namaskar
Sun Salutation (Surya Namaskar) is a set of asanas that can be performed as a warm-up before class or morning exercises after waking up.
For lovers of evening hatha yoga, the asana complex Salutation to the Moon (Chandra Namaskar) is available, which should be performed in the evening or as a good warm-up.
You can learn more about both complexes in the next article.
Hatha yoga for beginners: the very first poses
Standing asanas are a good place to start. They are more familiar to humans. There is no need to bend or twist here, although there are some that are performed from a standing position and progress to more complex options. But for those who have just begun to master yoga, it is better to start with poses such as Tadasana, Vrikshasana, Virabhadrasana. Moreover, even these poses have their own variations, and with the help of these simple exercises you will gain a lot of knowledge.
Sitting poses
Vajrasana is an outwardly simple pose from a sitting position, but it also brings many benefits by distributing energy along the spinal column from bottom to top. This asana and other asanas like Sidhasana, Sukhasana, Swastikasana and the classic Padmasana, which takes a little more time to master, are perfect for meditation practice. They are stable, keep the spine in the correct position, and can be worn for a long time.
Lying poses
Shavasana cannot be ignored here. This is the asana you will always end your daily yoga practice with. It is very simple to perform and will help you organically complete the entire set of exercises.
No matter how much time you devote to practice, be it 20-30 minutes a day or longer, always remember that by doing this pose after all the exercises, you bring the practice to a harmonious conclusion by accepting energy, allowing it to dissolve in the body.
This asana is not only good for finishing the practice, it is also one of the basic asanas that can be practiced while you are meditating. It has a wonderful effect not only on the physical body, but also on the emotional one, calming and putting in order the feelings.
Other poses include Ardha Navasana, Supta Baddha Konasana, and Supta Virasana. They are quite simple and will bring good results if done regularly.
Surya Namaskar - Sun Salutation
The “Surya Namaskar” complex should be highlighted separately. It is simply perfect for beginners to practice yoga. By performing Sun Salutations, you can master several basic asanas that make up the dynamic complex, and then practice them separately.
The entire implementation of Surya Namaskar takes only a few minutes and is usually used as a warm-up complex before starting practice, but can also be performed separately. If you like, you can do several circles, not just one.
Hatha yoga: exercises
The principle of regularity when practicing hatha yoga
The principle of regular practice is perhaps the most important. By practicing a little every day, you will achieve much more than practicing every once in a while. This principle applies to both beginning practitioners and continuing practitioners. Your muscles will always remain in good shape, and you will not need to start all over again after a long break. Gradual progress always has a very beneficial effect on your body, and mastering the practice will bring you joy.
It's better to exercise every day than once a week. It is absolutely not necessary to perform the entire set of asanas that you have already mastered if you are busy, but it is always advisable to practice at the allotted time, in the morning or in the evening. Soon it will become a habit and you will look forward to your practice time.
Convenience during exercise
All hatha yoga exercises should be performed in a way that makes you feel comfortable. That is, the point here is not at all to constantly overcome resistance or achieve something. Although, of course, when you begin to master slightly more difficult asanas, you may encounter some resistance and will need to devote more time to learning certain asanas. But the rule of yoga exercises is that while holding a pose, your body is relaxed, and being in the asana itself should be pleasant. This is also one of the criteria for correctly performing the exercises.
Compensation principle
Always remember the principle of compensation when you build your exercise routine. For every movement there must be a counter-movement. If you perform a tilt, then there should be a deflection. If you are tense, then you need to relax. Inhale and exhale - this is a simple principle by adhering to which you can safely practice yoga for a long time, and then it will bring you the expected benefits and spiritual enrichment.
Before starting classes, it is better to warm up to prepare your body for further practice. The already described Sun Salutation complex is best suited for this.
You can end your classes with Shavasana, which is ideal for this, to allow the body and energies to calm down.