Advantages and disadvantages
Let's start with the benefits of exercise:
- Allows you to work out the gluteal muscle group on each side in detail, visually improve the buttocks and increase the load even for trained athletes.
- Trains stabilizer muscles more effectively, which are activated when the body is in an unstable position. These include: thigh muscles - flexors and extensors, rectus and oblique abdominal muscles, lumbar extensors.
- Involves even more slow and fast muscle fibers by increasing the complexity of technique and balance.
What could be the disadvantages :
- This physically demanding exercise will be difficult for beginners, especially when it comes to keeping the pelvis in a level position and stabilizing the muscles. That is, the muscles simply will not be able to perform the movement correctly and get the effect.
- There is also a high risk of injury, which consists of a possible fall due to loss of balance, depending on variations in technique, overexertion and lower back pain.
- If the load is received unevenly, there is a risk of asymmetrical muscle toning.
One leg bridge
The glute bridge is an effective exercise for working the muscles of the buttocks. By performing this functional multi-joint movement, you can pump up the following muscle groups:
- Buttocks. The exercise involves all 3 gluteal muscles: large, medium and small. It is this group that receives the maximum load.
- Core muscles. A group of muscles (oblique and transverse abdominal muscles, hamstrings, adductors) is responsible for muscle activity and stabilization of the entire body.
- Low back, or spinal extensor muscles.
Read: How to warm up before training
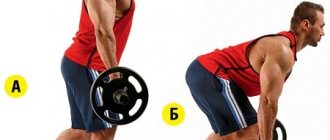
We recommend reading: Bent-over arm extension with dumbbells
Gluteal bridge 8 options
| Exercises | Sets | Repetitions/Time |
| Bridge on the floor | 3 | 20 |
| On the floor with a rubber band | 3 | 15 |
| On the floor in static | 2 | 60 seconds |
| Smith machine bridge | 3 | 12 |
| Bridge on a bench with a barbell | 3 | 12 |
| Bridge raises on one leg | 3 | 15 |
| With feet on a hill (or steppe) | 4 | 10 |
| Lying bridge with knees brought together | 3 | 15 |
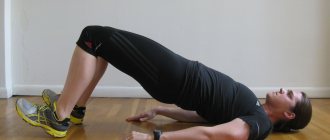
Glute bridge on the floor
Technique:
Lie with your back on the floor. Place your hands along your body, palms down. Bend your legs at the knees and place them at a distance of 30-40 cm from your butt, shoulder width apart. Inhale and lift your hips up, arching at the lower back. Exhale and lower your pelvis down
Important! Don't touch the floor with your buttocks.
How many:
3 sets of 20 reps.
To make things more difficult for yourself, use weights. Place a training plate or barbell on your thighs.
Read: Training programs for butt enlargement
Exercise options
Glute bridge with elastic band or rubber band
You can use a rubber band to make it more difficult for yourself. To do this, you need to fold it in half and pass it over the pelvis. And fix the ends on a fixed surface or hold them with your hands. Do everything the same as in the classic version. Try to lift your pelvis as high as possible.
Performing the exercise in static conditions
In addition, you can use the static load option. In this case, you should hold the body at the top point for as long as possible. This way you can even use additional muscles in your back and legs.
We recommend reading: Kettlebell push-ups
In the Smith machine
Technique:
- To begin, lower the bar of the machine to the level of the bench.
- Rest your back against the support. Bend your legs, press your feet to the floor.
- Place the pelvis under the simulator element: the bar must be removed from the supports.
- Exhale and lift your pelvis with the load. At the top point of the exercise, hold the position for a few seconds.
- Then slowly lower yourself down. During the exercise, you do not need to pause, lowering your pelvis to the floor.
Number of repetitions:
3 sets of 10 times.
Read: How to do a glute bridge in Smith
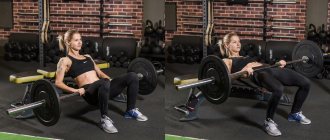
Glute bridge on a bench with a barbell
The exercise is performed similarly to the bridge in Smith. Instead of a simulator, we take a regular barbell. The movements in the exercise are more difficult in terms of complexity. You need to hold the barbell on your hips with your hands and concentrate on balance.
Bridge raises on one leg
Technique:
- Lie on your back. Bend one leg at the knee joint. Pull the other one up.
- Exhale and lift your pelvis off the floor. Stay for a while.
- Inhale and return to the starting position.
Repeat the exercise 3 times for 15 repetitions for each leg.
Read: How to do a glute bridge on one leg
With feet on a hill (or steppe)
Technique:
We recommend reading: Biceps hurt after training
- Press your body to the floor.
- Bend both legs and place them on a bench or other small elevation. The heels of the feet must be pressed and secured.
- Inhale – lift your pelvis.
- Exhale - lower.
Do at least 4 sets of 10 repetitions.
Read: Exercises to pump up the buttocks
Technique:
- Lie down on the floor. The arms are located along the body.
- Bend your legs, place your feet at a distance slightly wider than your shoulders.
- As you exhale, lift your pelvis and bring your knees towards each other. Stay in this position, and then slowly return to the original position.
Perform 3 sets of 15 reps.
The glute bridge is a simple and effective exercise for the gluteal muscles. After all, as you can see, it can be performed both in the gym and at home. The main thing in achieving the desired result is the regularity of your training.
A simple and beautiful pole dance element that can also be performed as a stretching exercise.
How to do it. The simplest version of the exercise is performed lying with your back on the mat:
Calculate your ideal sports weight!
— Legs bent at the knees, head and shoulders pressed firmly to the floor throughout the entire exercise.
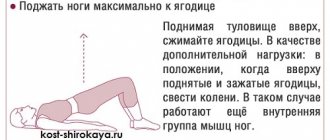
- Lift your buttocks up so that your body forms a straight line from your shoulders to your knees. Push your body forward with your feet.
- Squeeze your buttocks as much as possible at the top and hold. Raise one leg up and lock it in a tense position.
Mistakes to avoid. The hands are not under the shoulders, but far in front, the buttocks are relaxed.
Bridge on one leg. Instructor: Yulia Lushchikova.
Technique for performing on the floor
- Lie on your back, bend one leg at the knee and place your foot on the floor closer to your pelvis. Raise your other leg up. To make this option easier, you can lower the leg onto the supporting one, placing the ankle in front just below the kneecap. The arms lie along the body.
- Feel the support of your foot; when moving, it is important not to twist your pelvis or spine. The pelvic bones should move in the same plane, that is, one side should not sag.
- Exhale, pushing off with the heel of your supporting leg, lift your pelvis, trying to line up your spine and hips. The free leg remains in place and reaches towards the ceiling. It is important to tense not only the gluteal muscle, but also the abs, in order to prevent excessive arching in the lower back and not twisting the hip joint.
- As you inhale, slowly return your pelvis to the floor and continue.
- After completing the required number of repetitions, change legs.
Light version
Gluteal bridge - execution technique
Body movements that are completely natural for humans do not require any special effort. Both the standard exercise and its variations include three positions in its execution:
In the ranking of the TOP 10 exercises for the buttocks, the “Gluteal Bridge” takes 4th place .
- Starting position - lying on your back, emphasis on bent legs, arms along the body, lower back pressed tightly to the floor;
- Position of action - on a deep exhalation, the pelvic area and back rush upward until the body takes the position of an even, stretched string. At the same time, you should tuck your lower back a little so as not to overload it. At the highest point, squeeze the buttocks as much as possible;
- Return position – while inhaling, without ceasing to squeeze the gluteal muscles, we return to the lowest point.
Learn more from the video:
Important! When performing the above actions on the floor, we recommend using a gymnastic mat, travel foam or any blanket/plaid/spread.
Variants of the gluteal bridge on 1 leg
- In order to increase the load, you can use leg cuffs.
- The second option is an elastic band or ring, which should be placed on one side on the hip joint, and the other side should be fixed with the feet. The tighter the tape or the degree of its tension, the greater the load.
- Also, to increase the instability of the exercise and involve more muscle fibers, the supporting leg can be placed on an unstable surface, such as a barefoot or a balancing platform. You can also take a regular platform, even books or boxes, to increase the range of motion without compromising your balance.
- The next option is to use a fitball. In this case, the situation changes a little, but the essence remains the same. The supporting leg is placed on top of the ball and touches the shin, while the other leg is held vertically. The task is the same - to lift the pelvis up without losing balance.
- And another, more extreme option is to use two benches. The shoulder blades are placed on one bench, and the feet are placed on the second. In this case, the distance should be such that the knees are bent, as in the version on the floor. Then do the same: one leg rises up. With exhalation, the pelvis, due to the buttocks, rises above the level of the benches, and as you inhale, it slowly returns, falling slightly below the level of the hill. The difficulty is that the muscles do not relax during the entire approach, since they do not come into contact with a stable surface, and the amplitude increases.
Important: the last option is only for those prepared!
Types of gluteal bridge
It will be possible to increase the efficiency and effectiveness of training with the help of various variations of the bridge. Increasing the difficulty will help you get closer to your goal faster.
With a barbell
We associate the barbell with bench presses, squats and deadlifts. But this equipment is an indispensable assistant when performing gluteal bridges. The projectile must be placed in the groin area. You can avoid discomfort and pressure by using a towel or any other pad. This way there will be no damage to the skin.
The glute bridge with a barbell requires great caution from the athlete. You should not include the exercise in your program if you do not have the appropriate training. The recommended barbell weight for female bodybuilders is 113 kg, for men - 182 kg.
While your level is far from “professional”, take a barbell with an Olympic bar. The wide girth of the bar and light weight will increase the effectiveness of the exercise, but will not cause injury or discomfort after training. Recommended weight: 60 kg. An alternative would be a barbell or dumbbell plate. During the exercise, the plate will be located in the groin area, and the dumbbells will be on the thighs.
The execution technique is no different from the classic bridge. Lifting, fixing for a few seconds, smoothly returning to the starting position. The minimum number of approaches is 3, 10 repetitions each.
With one leg raised
This design option will increase the load on one side. The starting position is the same. When lifting, one leg remains bent at the knee, and the other is kept straight. The entire emphasis is placed on the foot of the bent leg. It is permissible to use a shock absorber or rod. Weight is selected in accordance with the initial physical data. At the bottom point, complete relaxation is provided before the next repetition.
Pay special attention to your straight leg. It should be tense and fixed in one position. Both thighs should remain parallel to each other.
A similar load will fall on one of the sides if the non-supporting leg is bent at the knee and the ankle is placed on the knee of the supporting leg. The knee should be perpendicular to the supporting leg.
Attention! Feel free to contact the professional trainers on our site for advice. This will avoid mistakes and increase productivity.
With a bench (reverse bridge)
The only difference when performing this option will be the position of the feet. We take the starting position, placing our feet on a hill (bench, step, stand). The pelvis should be as close to the bench as possible. At the lowest point, we try not to touch the floor and not pause. Fixation only at the top. During the exercise, emphasis can be placed on both feet. You can combine the two options and perform a bridge with a bench and one leg raise.
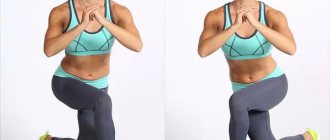
With knees brought together
We accept the classic starting position. Raise the pelvis and fix it. At the top point, squeeze your buttocks and bring your knees towards each other. This will put additional stress on the buttocks. A burning sensation should be felt in the muscles. This is a sure sign of compliance with the technique.
With fitball
The advantage of this type is the ability to use additional muscle groups. The need to maintain balance forces the stabilizing muscles to work. In the starting position, the shoulders are placed on the ball, the feet rest on the floor. Further execution without changes.
Now let's try to change the position of the shoulder girdle and feet. In the starting position, your shoulders are pressed to the floor and your feet are on the ball.
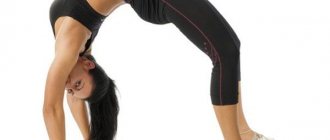
Side bridge
The side bridge is an exercise that also involves lifting the pelvis. In the starting position, we rest on one forearm and leg. Make sure your forearm is positioned directly under your shoulder. This will help avoid injury. Raise your pelvis and fixate at the top point for a few seconds.
In conclusion, one video with the technique of performing all types of gluteal bridges:
Having variations will add variety to your workout and help you avoid getting bored. Add weights to increase performance. Try combining different options to make it more complicated. Regular exercise will have a positive effect on the appearance of the gluteal muscles, develop endurance and increase the productivity of everyday and sports activities, and improve health. The exercise is suitable for any category of people.
How to implement it into training: recommendations
- Perform the exercise at the end of your leg workout. First, the muscles should be tired with complex multi-joint exercises, and then they can be “finished off” with a bridge on 1 leg.
- The number of repetitions, due to the complexity of the technique, can be significantly less than in the version on two legs, since the body weight is pushed not by both, but only by one side. Therefore, first of all, it is important not to lose the quality of the technique and perform as much as you can until you feel completely tired. Therefore, it is enough to perform approximately 10-20 repetitions on each side of 3 sets.
- After the exercise, it is necessary to stretch the gluteal muscles to relieve excessive tension in the muscles and prevent their stiffening.
- Perform the exercise 1-3 times a week, depending on the amount of leg training.
And also read: All options for the gluteal bridge →
Varieties
The gluteal bridge has many varieties that make it possible to diversify and complicate the load. Let's look at the most popular ones.
Single leg glute bridge
In this embodiment, only one leg is fixed on the floor in its original position. The second one needs to be lifted and pulled up or placed on the knee of the supporting leg. As a result, one side of the body is worked out, and the gluteal muscles are alternately used.
In the future, the execution technique is the same as in the classic version.
Glute bridge on a fitball
On a fitball you can do both the classic version of the exercise and a variation with one leg. In this case, the legs are fixed on the ball, and not on the floor. Due to the increase in amplitude, the load also increases.
You can also place your shoulder blades, not your legs, on the fitball, and raise your pelvis to a straight line with them. At the lowest point, to reduce the load on the lower back, the pelvis must touch the floor.
In general, the technique of lifting does not differ from the classic version, but the difficulty is that you additionally need to maintain balance and concentrate on the ball. Stabilizing muscles will also be involved.
Glute bridge with barbell
For advanced athletes, a more complex exercise with weights, such as a barbell or barbell, may be suitable. The technique in this case will be as follows:
- Take the starting position as in the classic version.
- Fix the barbell on the hip crease, gripping the exercise machine with your hands from above. Under no circumstances should you fix it on your stomach.
- Raise your pelvis together with the barbell, hold for a couple of seconds at the top point, then lower.
All actions must be performed smoothly and carefully.
Experienced athletes can increase the load by lifting the barbell at the lowest or highest point. You can also perform the exercise with a weight in the form of a plate or dumbbells of a suitable weight, holding them with both hands.
Glute bridge with elastic band
An expander is a great way to diversify the load. Girls often resort to him. The execution technique in this case will be as follows:
- Similar starting position.
- Fix the ends of the double folded elastic band at the level of the hip crease on the floor. The elastic band itself should pass over the pelvis.
- When lifting the pelvis, the muscles receive different loads at different times. At the highest point the resistance will be maximum and the load will be strong. You can vary the load by tightening the elastic band more or loosening it.
Glute bridge on a bench
When performing an exercise on a bench, the principle is the same as on a fitball. Due to the elevation, the amplitude of movement and load increases. Strengthening is possible through two options:
- The shoulder part of the body is located on the bench. Bend your legs and firmly fix them on the floor. The back should be straight, without arching. As you exhale, push your buttocks up, and as you inhale, return to the starting position. The buttocks should be tense at all times.
- The legs are on the bench, knees bent, the body is pressed to the body. As you inhale, lift your pelvis as high as possible and hold at the top point; as you exhale, return to the starting position.
With emphasis on the bench, you can also do the exercise with emphasis on only one leg or with your knees together.
Those who go to the gym can perform the exercise in a Smith machine. The technique in this case is as follows: you need to position yourself right along the edge of the machine bench, press your feet together and spread your legs shoulder-width apart. Place the roller strictly on the hip bone. The pelvis is held in the air. Place your hands on the roller. For the correct movement, lift your pelvis up through the efforts of your gluteal muscles and align it parallel to your body and hips. Hover at the top for only a couple of seconds, then lower your pelvis and repeat the movement again. Go down according to your capabilities; it is better not to sit on the floor.
In a similar way, the exercise can be performed in a leg curl machine. You need to lie on the edge of the bench with your shoulder blades, spread your legs shoulder-width apart, and press your feet to the floor. The roller is located at the level of the hip bone, the hands lie on it, the pelvis is suspended. Using the force of your buttocks as you exhale, lift your pelvis up until your hips and body are parallel. Hold at the top for a couple of seconds, squeezing your buttocks tightly. Then lower yourself and repeat the movement.
What is a gluteal bridge, what muscles work?
The gluteal bridge, the technique of which involves not only control over the position of all parts of the athlete’s body, but also his breathing during exercise, is a lifting of the pelvis from a lying position on the floor or while sitting in a machine.
You can perform a bridge either with your own weight or using additional weights. Fitness trainers recommend including pelvic lifts in the middle or at the end of the training complex, since one of its main positive effects on the human body is stretching the muscles of the lower body.
Provided the gluteal bridge is performed correctly, the athlete will be able to work on:
| Muscle group category | Names of specific muscle groups |
| Main (they account for most of the load) | If the bridge technique is followed, the load is mainly distributed between:
|
| Additional (muscles involved secondary) | If the bridge technique is followed, a small percentage of the load is also distributed between:
|