The fitness industry is constantly evolving and today presents at least three designs for isolated loading of the thigh muscles, and this is only for the abductors! And for good reason, because women in particular pay great attention to their hips and buttocks. Accordingly, the simulators are constantly being improved and modernized. But this also has its benefits for men: some designs allow you to isolate the work of the hips in case of back injuries and diseases. Let's look at all the options for leg extensions in the simulator, their technique and features.
The benefits and disadvantages of leg extensions in the simulator
Pros:
- The simulator provides isolated load on the abductor muscles of the thigh. Unlike basic leg exercises, the simulator does not involve the quadriceps and adductor muscles, so by using the leg abduction in the simulator you can work and improve the shape of the gluteal muscle.
- The simulator completely eliminates the load on the spine and joints, except for the hip. Certain designs and body positions reduce stress on the lower back muscles.
Minuses:
- The exercise is not as effective as squats or leg presses, since the load is applied to a minimum of muscle groups. Therefore, it does not help speed up metabolism and fat burning in general, as is the case with multi-joint exercises.
- Seated leg raises are effective only as a complementary technique to other exercises and are not the main one in leg training.
- This option also cannot enlarge the buttocks without exercises with free weights.
Crossover hip extension
Hip extension in a crossover is performed almost the same as in a simulator. However, performing the exercise in a crossover is better than in a simulator. Since the range of movement of the legs in the crossover is more natural than in the simulator. Thanks to this, there is practically no load on the joints, but the load on the muscles of the buttocks and thighs increases.
However, this technique also has a significant drawback - it is necessary to constantly monitor the position of the body.
In the simulator, the athlete lies down on a cushion, and accordingly he does not need to monitor the position of his back and head. But in a crossover you need to keep your back straight, watch your posture and movements. Because of this, this technique is considered more difficult. Therefore, it is recommended for more experienced athletes to do crossover leg extensions.
Crossover hip extension:
- First you need to prepare the device: install the crossover on the lower blocks, select a handle (it should be one-sided with a loop for arms and legs).
- After everything is ready, you need to place your foot in the handle and rest your hands on the stand of the device. In this position, a slight arch should form in your back. In order for the weight to be distributed correctly, you need to move your head back as far as possible.
- After this, you need to pull the projectile back with a straight leg. Having reached the maximum point, you need to slightly bend your leg at the knee and stay in this position.
- Then you can return to the starting position.
When performing a crossover exercise, you must consider the following:
- It is important to work carefully. Especially when the knee bends, as the foot can slip off the handle and this can lead to a sprain or dislocation.
- You can't rush, you need to work at a moderate speed. It is important to pay more attention to technique rather than speed and number of repetitions.
- During training, you should tense your muscles, this will increase the effectiveness of the exercise.
After this technique has been mastered, you can complicate the activity: use both legs. In the crossover, you can secure both legs and do extensions in turn.
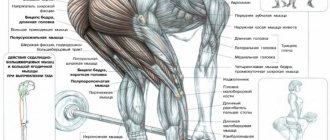
What muscles work when you raise your legs in the simulator?
It is important to understand that in different variations some muscles will work more strongly and others less. By changing the inclination you can also target different parts of the muscles. In the technique of performing the exercises, we will consider these features in more detail.
The main load is received by:
- Gluteus medius.
- Gluteus maximus.
- Gluteus minimus (internal muscle).
Exercises for the gluteus medius muscle to lift the top of the buttocks →
Auxiliary muscles that are involved in the work:
- Tensor fascia lata.
- Piriformis muscle.
- External oblique abdominal muscle.
- Rectus abdominis muscle.
- Vastus lateralis muscle.
- Rectus femoris muscle.
- Quadratus lumborum muscle.
Muscles involved
Some of the benefits of performing backswings in a crossover include the following:
- The exercise is aimed at working the gluteus maximus muscles. Additionally, the muscles of the back of the thigh are involved.
- The crossover does not fix the trajectory of the leg movement and the position of the body, so in addition to the target muscles, stabilizer muscles work.
- You can adjust the level of load on the gluteal muscles not only by changing the weight in the simulator, but by changing the position of the body, bending/extending the working leg.
The main load when performing the exercise falls on the buttocks.
This exercise is isolated, ideally, movement is carried out only in the hip joint.
Kickbacks can be performed as an alternative to squats for knee injuries, since they do not involve the knee joints or involve them minimally (when bending the working leg).
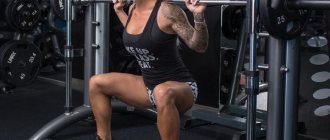
The hip abduction is a fairly simple exercise that even beginners can do.
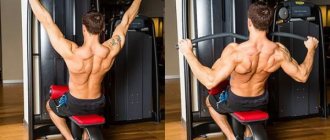
Technique for performing leg raises while sitting with your back pressed
- Pre-set the required load weight; it should be moderate to perform a large number of repetitions.
- Sit in the exercise machine, rest your pelvis and spine as much as possible on the seat. Place your feet on special supports and press your outer thighs closer to your knees into special supports.
- Grasp the handles, tighten your abs to fix your spine in one position.
- Exhale and move your legs to the sides, performing the movement at a fairly fast pace, but not abruptly. You should not abduct too widely, working the joint to the maximum, but the tension in the buttocks should be felt.
- As you inhale, bring your hips together more slowly, but not all the way, keeping tension in the abductor muscles. Block slabs should not be completely lowered.
- Repeat several times until you feel a burning sensation in the gluteal muscles.
Basic mistakes and useful tips
For the training to be most effective, the following recommendations must be followed:
- While performing the element, keep an eye on the body - it should always be straight. Also avoid any displacement of the back relative to its original position.
- Your legs should be spread as far apart as possible.
- You need to spread your legs powerfully, and bring them together slowly and under control - there should be pressure, not a contraction by inertia.
- There is no need to bring the limbs down to the end; there should be a small gap that maintains muscle tension.
- At the end point you need to pause and perform a peak contraction.
- Hands should always be placed on the side handles.
- Follow the breathing technique: exhale with effort - dilation, inhale - with reduction.
- Make sure that during the training process only the hip joints work. The ankle and knees should not be involved.
- Try to keep your toes pointed outward at all times, so your buttocks will receive the most stress.
- Watch the outer surface of the thigh - it should touch the machine tightly. Otherwise, the load will transfer to the quadriceps.
- Choose the right weight. It shouldn’t be too heavy, but you also shouldn’t leave the exercise machine without being tired. The optimal weight will be at which the last repetitions are difficult and with a burning sensation in the muscles.
Read also: Deep breathing technique for weight loss
Need to know! The simulator allows you to not only work out the outer surface of the thigh. Knowing some nuances, you can also effectively use the buttocks. To do this, you need to change the tilt of the seat back. The gluteus medius will work more in a backward position, and the gluteus maximus will work more in a vertical position.
Leg extensions in the forward bending machine
This option will be performed in the same way as the previous one. One difference is the forward tilt of the torso by almost 45 degrees. At the same time, it is important to keep your back straight. This technique puts more stress on the upper gluteus maximus muscle.
Standing leg raises in the simulator
In fact, a special machine for standing leg raises exists, but it is very rare. Its difference from a sitting exercise machine is the absence of a seat and the presence of front handles for fixing the body.
Standing leg raiser
But this exercise can also be performed on a sitting machine; to do this, just put your feet on the stands, lean forward, holding on to the structure of the machine, raise your pelvis and hold the canopy throughout the approach. There is no need to move your legs too far; the range of movement remains the same. This option allows you to put more stress on the buttocks, including the gluteus minimus muscle. In this case, the flexors and extensors of the legs are loaded in a static position.
How to implement it into training
- It is necessary to perform any of the adduction options after basic leg exercises as a final exercise. For example, if you do a leg workout once a week, you can do the adduction after squats and other multi-joint exercises at the end of the workout.
- If leg training is performed twice a week on antagonists, then adduction should also be performed once a week, since in the second workout the abductor muscle groups will work.
- You can also perform three workouts per week, including two exercises for each part of the lower extremities. For example, on one day you can train the adductor muscles: plie squats + leg adduction, on the other days - flexors and extensors. This option is more suitable for girls.
You should not perform the exercise with heavy weight; it is better to train the adductors in the range of 15-20 repetitions for 3-4 approaches.
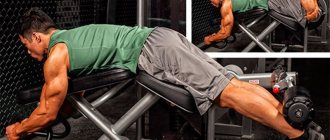
Lying leg extensions in the simulator
This kind of exercise machine is also rare, but some designs provide for changing the inclination of the back of the machine. This technique reduces the load on the spine and lumbar muscles, which allows you to train during the recovery period after injuries and with spinal problems. There is no need to move your legs too wide. In this position, the lower part of the gluteus maximus muscle works more strongly.
How to replace leg raises in the simulator
In the gym, the exercise can be replaced with isolating exercises: standing leg abduction in a block simulator “pendulum” or in a crossover.
At home, you can use a rubber band or mini-band.
- Seated leg raises with elastic band.
- Gluteal bridge.
- Leg raise while lying on your side.
- Abduction of the leg while resting on the knee.
- Added steps with elastic band.
- Swing your legs to the sides while standing.
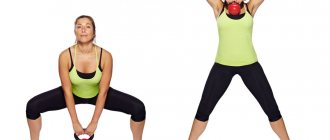
Free weights
Working at home, like training in the absence of a gym, is a separate issue. It should be noted right away that the work in this case will not be as effective. However, to maintain muscle tone, or in cases where it is not possible to exercise in a fitness club, this becomes the only alternative.
There are two main exercises. This is hip extension while lying on the floor and a similar hip extension at the counter (option for ballerinas). In the latter case, hip extension uses the muscles much more intensely, but requires special athletic training and superhuman stretching. Therefore, consider the option of lying hip extension.
What muscles does it use?
Absolutely the same groups as working in a simulator or crossover.
How to do it?
Option 1. Classic.
- Lie on the floor on your stomach.
- Extend your legs, making a constant angle in your toes.
- Slowly pull your leg up.
- Fix it at peak voltage for 3-4 seconds.
- Lower your leg.
- Carry out the same operation with the second one.
Option 2. Basic basket.
Read also: TOP 25 sports fashion fads 1985 – 2018
Yes, many have been familiar with this exercise since childhood. It’s not for nothing that it was included in the basic set of exercises for elementary schoolchildren. Its most important difference is that it:
- Allows you to adjust the load using your hand grip strength.
- Allows for static loading.
- Shifts the focus to the lower back muscles.
At the same time, if you do it incorrectly, then in fact the result is not hip flexion, but extension. Therefore, carefully monitor the technique and features of execution.
- Lie on the floor on your stomach.
- Extend your legs, making a constant angle in your toes.
- Slowly pull your leg up.
- Bend your leg at the knee.
- Reach it to your hands.
- He will grab his leg with his hands.
- The arms should be as relaxed as possible, the main load should be carried out by bending the body and holding the hips in the correct position.
- Shift the focus to your hands (grab tightly and pull your legs towards you).
- Carry out a compensatory movement, trying to straighten your legs despite the movement of your arms.
- Relax the muscles of your legs and arms.
- Return to starting position.
Thus, through proper use of the basket you can use:
- hip extensors,
- hip flexors,
- quadriceps,
- calf,
- deltas,
- biceps,
- lumbar muscles,
- core and abdominal muscles.
Which makes it preferable to the classic variation.