The plank is one of the most effective and simplest ways to strengthen your abdominal muscles. When done correctly, it helps strengthen the muscles in your arms, back, and core. Below we will look at options for performing this exercise. Running and general physical training coach Alisa Matyash shows you how to perform the exercises correctly.
The “Health” section is your detailed guide to healthy lifestyle issues. Training, nutrition, amateur sports - we have only the most important and useful information that will help you become better every day. Subscribe to our telegram channel to be the first to receive the latest articles.
Types of planks and technique
Different types of exercises are similar in technique, but they train different muscle groups.
Straight arm plank
Standard version of the exercise. Place a mat on the floor and place your hands palms down. Raise your body so your back and legs should form a straight line. Hold this position for as long as possible, then rest and repeat the approach.
- Lie down on the floor as you would for regular push-ups. Raise your body, resting solely on your palms and toes. A perpendicular line should run from the shoulder along the arm to the floor.
- Your legs should not bend, try to keep them straight.
- The back does not arch or bend, the shoulder blades are slightly lowered. The tailbone should not protrude.
- The abdominal muscles should be in constant tension throughout the entire exercise.
- A small life hack - the further apart you spread your feet, the easier it will be for you to stand in the plank position, but the effectiveness of the exercise will decrease.
- Breathing during execution should be measured and calm.
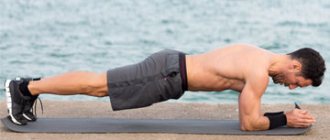
Elbow plank
A more complex version of the plank, which involves keeping your body weight on your elbows and toes. Elbows are bent at an angle of 90 degrees. When performing the exercise, the body should be parallel to the floor, not sag or bend - it will be easier to keep a straight line if you tense your buttocks. In addition to the abdominal muscles, the muscles of the thigh and lower back, as well as the pectoral muscles, work here.
In this type of plank, basically everything is done in the same way as in the hand plank. The only difference will be that you rely not on your palms and hands, but on your forearms.
- Take your starting position.
- Bend your elbows, place them on the floor and rest on your forearms.
- To make the exercise more difficult, you can lift one leg or arm and keep it parallel to the floor.
- You can connect the plank on your elbows and arms, alternately changing positions - moving from a plank on your hands to a plank on your elbows and back, bending and extending your arms.
Plank with leg or arm extended
This exercise is more difficult because there are now three fulcrum points instead of four. Not only do you have to keep your body in a plank position, but you also have to make sure that the raised leg or arm does not fall below the line of your back. This plank provides a complex load on muscle groups and improves your sense of balance and balance.
Side plank
This version of the plank involves pumping the lateral abdominal muscles and oblique abdominal muscles - they are most involved in the exercise. Make sure that the body is in line with the legs, and the pelvis does not sag down. The feet need to be placed on top of each other, or the leg that is on top should be brought forward.
What is a plank?
The plank is an exercise that helps strengthen the rectus and oblique abdominal muscles. It has several different options, which differ in the complexity of implementation and the area that works in the process.
The exercise is quite popular in the fitness field. It is part of various comprehensive, functional training. Its varieties are found in yoga and Pilates classes.
Types of planks:
- classic - on straight arms;
- classic - on the elbows;
- lateral;
- with twist;
- with push-ups;
- with arm or leg extension.
There are many options for implementation. New ideas are constantly appearing to complicate the classic version. But for those losing weight, something else is important - is it possible to get rid of excess weight in this way, will such an exercise help to remove the stomach and sides.
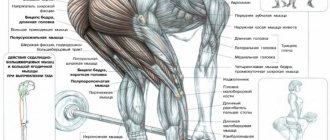
What muscles are involved when doing a plank?
The plank is a universal exercise that uses many muscle groups during execution.
- Arm muscles - all types of exercise actively use the arms. During the exercise, you take a prone position, and your limbs are subject to heavy loads to keep your body in the desired position.
- Abdominal muscles - the essence of the exercise involves actively pumping the abdominal muscles, and various types of planks also pump the lateral abdominal muscles, which are difficult to quickly strengthen in any other way.
- Back muscles - during the exercise, your back should be straight, this is achieved through the work of the muscles and spine.
- Muscles of the legs and thighs - the body in the pelvic area is supported by weight thanks to the work of these muscles.
- Neck muscles - the head should be in line with the body, it should not be tilted down too much. The neck muscles, together with the upper trapezius, work to hold the head in the desired position.
Straight arm plank technique
- Start entering the plank from your knees: place your knees the width of your pelvis, place your palms under your shoulder joints parallel to each other, both arms should be perpendicular to the floor. Under no circumstances should you shift the center of gravity and overload your joints.
- Tighten the abdominal muscles and press them against the spine so as to align the line of the natural deflection of the lower back, while slightly twisting the pelvis. The spine should be in a straight line.
- Straighten your knees and place them on your toes, hip-width apart. Pull the top of your head forward. Collect your shoulder blades towards the center of your back, without protruding them or rounding your chest.
- Hold the position for a certain time, as soon as you see that the lower back is sagging, finish the exercise. Breathing is calm and spontaneous.
How long to stand in plank
Numerous marathons offer to learn how to stand in a plank for 5 or even 10 minutes in a row in a month. This is not very useful: in an untrained person, the target muscles quickly get tired. The opposite effect is obtained: the load is transferred to the ligaments and stabilizer muscles, the body is held in the desired position due to them, and not due to the muscles that you originally intended to pump.
Therefore, it is better for beginners to stand in the plank in short sets with little rest. For example, if you are doing a plank as part of a warm-up, you should stand for 10-30 seconds, followed by 10 seconds of rest, and perform 2-3 repetitions.
If the plank is part of the workout, and you perform it both statically and dynamically, in different positions, stand in each position for 60 seconds. Under the supervision of a trainer and if you are confident in your abilities, you can increase the duration to 1.5-2 minutes.
If you have back problems, it is better to perform the plank in short sets of 20 seconds with a rest on your knees for 3-5 seconds. You need to perform 5-8 repetitions (depending on your level of training). Doctors also advise performing side planks, alternately on each side, to strengthen the spinal muscles.
How long to keep?
A universal answer to the questions “How often should I do it” or “how long should I hold the bar?” does not exist. It depends on the individual characteristics of each organism. A trained person can move on to heavier variations of the plank and significantly increase the load, and therefore the effectiveness of this exercise, while an untrained body is unlikely to be delighted with even 30 seconds of holding the plank. Try to find the best option that suits your level of training, and gradually increase the duration and number of approaches.
We publish a sample schedule for the plank exercise for 30 days. Follow it every day to set your limits.
| Day 1 - 20 sec. | Day 16 - 2 min. 40 sec |
| Day 2 - 25 sec. | Day 17 - 2 min. 50 sec. |
| Day 3 - 30 sec. | Day 18 - 3 min. |
| Day 4 - 35 sec. | Day 19 - 3 min. 20 sec |
| Day 5 - 45 sec. | Day 20 - 3 min. 30 sec. |
| Day 6 - 1 min. | Day 21 - 3 min. 35 sec. |
| Day 7 - 1 min. 10 sec. | Day 22 - 3 min. 40 sec. |
| Day 8 - 1 min. 20 sec. | Day 23 - 3 min. 50 sec. |
| Day 9 - 1 min. 30 sec. | Day 24 - 4 min. |
| Day 10 - 1 min. 40 sec. | Day 25 - 4 min. 20 sec. |
| Day 11 - 1 min. 45 sec. | Day 26 - 4 min. 25 sec. |
| Day 12 - 1 min. 50 sec. | Day 27 - 4 min. 30 sec. |
| Day 13 - 2 min. | Day 28 - 4 min. 40 sec. |
| Day 14 - 2 min. 10 sec. | Day 29 - 4 min. 50 sec. |
| Day 15 - 2 min. 30 sec. | Day 30 - 5 min. |
We recommend a video with different types of planks
The benefits and harms of planks
The plank is useful not only for complex pumping of the muscles of the back, abs and legs, but also for increasing concentration, developing the ability to maintain balance and balance, etc. Let's look at the main benefits of the exercise, and also talk about contraindications.
Benefits for the back
The back is one of the most problematic parts of the human body. A sedentary lifestyle leads to pain in the lower back, and professional athletes often complain of back pain due to heavy loads. The reason for all this is weakness of the core muscles. The plank is specifically aimed at strengthening the necessary muscle groups of the back - rectus, latissimus, lumbar and neck muscles. Your posture becomes straighter and straighter, and the impact on the abdominal muscles makes your stomach beautiful and toned.
Remember, you cannot perform the exercise if you have problems with the spine, this can only aggravate the situation. Violation of the execution technique also leads to injuries.
Benefits of planks
The plank is not an exercise designed to build six-pack abdominal muscles. Its benefit lies precisely in the comprehensive strengthening of the entire muscle corset. The volume of muscles does not increase during its implementation, but the muscles become toned, their strength and endurance increase.
The benefits of the plank exercise are as follows:
- There is a strengthening, development of strength and endurance of a large number of muscle groups (abs, back, legs, chest, shoulders).
- The stomach tightens, the waist becomes narrower, the looseness of the silhouette disappears, which is very useful in the process of losing weight.
- The position of the lower spine is stabilized. At this point it is worth saying that if you have diseases or injuries to the spine, you should consult a doctor before performing the exercise. Sometimes increasing the tone of the muscles surrounding the damaged area may be contraindicated.
- The skill of holding the body straight is developed. This will greatly help you both in everyday life and when you do other fitness exercises, such as squats.
In addition to the above, it can be noted that you do not need any additional equipment for training. You can exercise at home, in the gym or anywhere.
How to make the plank more difficult
Add dynamics: this will help work the muscles better. But remember that dynamics make the exercise more difficult; in dynamics it is easier to get distracted and stop paying attention to the technique. Watch the position of your shoulders, arms, back - it should be motionless. The load should fall on the abdominal muscles.
- Extend your leg or arm and keep it parallel to the floor while doing the plank. This will reduce the number of support points and increase the load on the entire body.
- Combine hand and elbow planks into one exercise. From the plank on your hands, go to the plank on your elbows and back.
- You can do a plank with a turn, alternately stretching one of your arms up, leaving your body weight on the other arm.
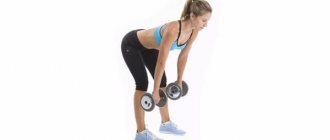
- The side plank can be performed using a dumbbell - raising and lowering the hand that is on top to your hips.
- Change the side plank and the classic plank - do one for 10 seconds, then the other for the same amount.
- In a classic plank, stand on your fists instead of your palms.
How to do it correctly?
Take a look at the photo, A, B, C, showing the mistakes that beginners make, so let's take a detailed look at the starting position and rules of execution. Look carefully at the picture; the bottom one shows the correct execution.
Starting position of the straight line:
- Take the correct starting position: emphasis on the elbows, with the elbow joint exactly under the shoulders and making an angle of 90 C with the forearm.
- The back is straight, does not fall or arch, the stomach is retracted. Shoulders, back, hips on the same line.
- The head is not lowered down or raised up, but is a continuation of the straight line of the back.
- There is no arch in the back.
- We stretch forward with the top of our head, i.e. the head is not thrown back, but the gaze is directed downward or forward, and the buttocks are directed downward.
- The stomach is pulled in.
- We breathe evenly and calmly, do not hold our breath.
Correct technique:
- Before starting the exercise, at least an hour should pass after eating.
- Prepare yourself a rug or a carpet will do, thick and soft so that your elbows and knees don’t hurt.
- A bare floor or a towel are not the best options; painful sensations cannot be avoided.
Be sure to warm up before performing the plank routine.
Therapeutic
Here, focus on your elbows and knees, fix your body position and stand in the plank for 30 seconds, then rest.
Repeat 5-6 approaches for 30 seconds, provided that this is not the first time you have performed it, otherwise 1-2 times is enough.
Classical
Having fixed the correct position of the body, straighten your legs one by one from a lying position, moving to a plank position and leaning on your toes.
Important: when standing on your elbows, do not cross your arms or clasp your fingers, look straight ahead. Clench your hands into fists or place your palms down in front of you.
Please note that your body with your elbows makes an angle of 90 C, i.e. Elbows strictly under your forearms, to remove all the tension in your back, lightly pull the mat towards you while already standing in the plank. Make sure your arms don't extend forward or backward.
Check the position of your shoulder blades by making a circular movement with your shoulders.
Secret: wide legs make it easier to perform the exercise, while narrow legs will be a more difficult option.
Therefore, the correct positioning of the legs will be: both on the top of the knees and wide apart and narrow, but beginners should try the wide apart version and switch to the narrow one gradually, when the heels are close to each other and the toes are apart.
It is important to breathe evenly and calmly, concentrating on the work of the muscles and checking whether you have any clamps and whether you are performing the exercise correctly.
Detailed analysis of the straight elbow plank from Milena Poznyak in the video:
Training Recommendations
- Buy an inexpensive fitness mat and do planks on it - it will be more comfortable and convenient;
- Do not limit yourself to one plank, perform various physical exercises - push-ups, pull-ups, squats, with the help of them you will comprehensively strengthen the muscular corset of the body. Also don't forget about cardio training;
- If you do the plank not at home, but on the street or in the gym, then take care of comfortable shoes;
- When using a stopwatch, you will be constantly distracted by it - put it away or ask someone else to time it;
- Breathing when performing the plank should be even and measured; under no circumstances should you hold it;
- Do not exercise directly after eating. The best time is before breakfast in the morning and an hour before meals at any other time;
- Do not forget about warming up and joint exercises before exercise - this will help avoid injuries and prepare the body for stress.
Body correction with a plank
The main benefit of regularly doing the plank is strengthening the muscle corset. The body changes visually, becomes stronger and more toned.
In addition, when performed correctly, it can bring the following benefits:
- strengthening the back muscles, which is especially important for people who lead a predominantly sedentary lifestyle (office employees, schoolchildren, students, retirees);
- reduction of pain in the neck and spine - the plank exercise is often included in the complex of physical therapy prescribed by a doctor;
- increasing endurance, since standing in the plank for a long time is not easy, muscles tense, trembling appears, and you need to overcome yourself in order to defend the required time;
- improved blood circulation, active supply of oxygen to cells;
- improved mood - when performing any physical exercise, the production of hormones is activated, including dopamine and serotonin.
Making exercises more difficult
To complicate the technique, you can raise your legs and arms in various ways; to do this, you can continue to hold a static position, or perform a dynamic load. Let's consider the possible options.
Medium difficulty level
Straight arm plank: option 1
Hold your right arm outstretched while standing on two legs. Then change to the left hand.
Straight arm plank: option 2
Holding the straight right leg in a canopy, then replacing it with the left leg.
Elbow plank: option 1
Holding the right outstretched arm on two legs. Then change to the left hand.
Elbow plank: option 2
Holding the straight right leg in a canopy, then replacing it with the left leg.
High load level
Straight arm plank: option 1
Simultaneously hold the right arm in a canopy and the left leg. Then you should change sides.
Straight arm plank: option 2
Alternately lifting the arms and the opposite leg.
Elbow plank: option 1
Simultaneously hold the right arm in a canopy and the left leg. Then you should change sides.
Elbow plank: option 2
Alternately lifting the arms and the opposite leg.
PLANK EXERCISE: GENERAL INFORMATION
The plank has long been a classic exercise not only in abdominal training, but also in general training for the whole body. This functional exercise allows you to use a large number of muscle groups, and does not require any additional equipment or extensive training experience. The plank can be practiced by both beginners and advanced practitioners. It is thanks to its practicality, effectiveness and universal accessibility that the plank is such a popular exercise among trainees.
The plank engages the muscles of the upper and lower body, which means you will strengthen your entire body, making it elastic and toned. This exercise is especially useful for the development of the muscle corset (abdomen and back). A strong core keeps the spine in the correct position, which means it helps reduce the risk of musculoskeletal diseases.
HOW TO DO THE ELBOW BLANK CORRECTLY?
Stand on the floor in a lying position - push-up position. Bend your elbows 90 degrees and shift your weight to your forearms. Your whole body should form one straight line, your stomach should be tucked, your muscles should be tense.
What to pay special attention to:
- Head and neck: should be relaxed and free. Look at the floor, don't raise your head up.
- Hands: keep them straight in front of you or clasp them together. Place your elbows strictly under your shoulder joints so as not to create unnecessary stress on your shoulders. Keep your shoulders down, don't raise them towards your ears.
- Lumbar: It should neither be rounded nor arched. Imagine that your lower back is pressed tightly against the wall.
- Legs: Should remain straight and tense. Otherwise, the main load will be transferred to the lower back, and not to the abdominal muscles.
- Buttocks: Should also be tight and level with your back. Don't arch your pelvis or lift your buttocks up.
- Abdomen: pull in, and then (already pulled in) try to pull it towards the ribs. Keep it taut throughout the exercise, but do not hold your breath.
- Feet: can be joined together, can be slightly apart. The closer you place them to each other, the greater the load on the abdominal muscles and the more difficult it is to perform the plank.
- Breathing: Be sure to remember to breathe deeply throughout the exercise. Inhale and exhale slowly and steadily.
Hold the plank position for as long as you can. When you feel that it is becoming difficult for you to maintain proper form, end the exercise. Never increase the duration of an exercise at the expense of technique! Better take a break and repeat the exercise in 3-4 circles with short stops.
HOW LONG SHOULD I DO THE PLAN?
The plank is suitable for all fitness levels because you can always increase or decrease the duration of the static position depending on your fitness level.
- Beginners can hold the plank for 15-30 seconds, intermediate level - 30-60 seconds, advanced - 60 seconds or more.
- Practice the plank regularly; it is better to do the exercise in several approaches. If possible, do planks for at least 5 minutes every day.
- Try to progress in the plank. For example, by increasing the time you hold the plank, increasing the number of approaches, or making the modifications more difficult.
- Do other bodyweight exercises to develop different muscle groups. For example, push-ups, squats, lunges. This will help pump up the entire body even at home without additional equipment.
- Sooner or later the body adapts to any exercise. You should not constantly move towards increasing the plank time; it is better to move on to more complex versions of this exercise. If 2-3 minutes of planking is not particularly difficult for you, then feel free to move on to more complex modifications.
Exercises based on planks can always be simplified or complicated. If you are a beginner, do the plank on your knees. If you are an advanced practitioner, you can raise your arm or leg and hold the bar in that position.
CONTRAINDICATIONS TO PLANKS
Despite the fact that the plank seems to be a fairly harmless exercise, in certain cases it is not recommended to perform it. The plank has the following contraindications:
- Injuries to arms, shoulders, ankles
- Pregnancy and postpartum period
- Muscle diastasis
- Hypertension or hypotension
- Intervertebral hernia
- Spinal injuries
- Diseases of internal organs
- Exacerbation of chronic diseases
If you are overweight, it is recommended to practice only the plank version on your knees and for no more than 30 seconds.
WHAT MUSCLES WORK IN THE PLANK
When performing a plank, the muscles of the abdomen, back and shoulders are primarily involved in the work. The plank also engages the muscles of the buttocks, chest, calves, front and back of the thigh.
So, during the classic elbow plank the following muscles are involved:
- Rectus and transverse abdominis muscles
- Latissimus dorsi muscle
- Muscles of the lumbar region
- Muscles of the shoulder girdle
- Trapezoid
- Pectoral muscles
- Gluteal muscles
- Quadriceps and hamstrings
- Calf muscles
When performing a side plank, additional load is placed on the oblique abdominal muscles, as well as on the muscles of the outer and inner thighs. The side plank is one of the best exercises to strengthen your obliques and stabilize your spine for a healthy back.
TRAINING PLAN WITH PLANKS
We offer you a ready-made plank training plan that can be performed as an addition to any program. Just follow the suggested plan and work on perfecting your figure.
For your daily workout, four exercises await you: elbow plank, hand plank, side plank on the forearm of the right hand, side plank on the forearm of the left hand.
1. Elbow plank
2. Plank on hands
3. Side plank on the forearms
You will repeat all exercises in several approaches. We offer you this plan:
- First week: each exercise is performed for 15 seconds in 3 sets, a break between sets of 30 seconds, a break between exercises of 60 seconds.
- Second week: each exercise for 25 seconds in 3 sets, a break between sets of 30 seconds, a break between exercises of 60 seconds.
- Third week: each exercise for 35 seconds in 3 sets, a break between sets of 20 seconds, a break between exercises of 60 seconds.
- Fourth week: each exercise for 45 seconds in 3 sets, a break between sets of 20 seconds, a break between exercises of 60 seconds.
If necessary, you can adjust the proposed plan, or perform each exercise at a more comfortable time for you, or perform simplified modifications (on your knees).
ADDITIONAL TYPES OF PLATES
Additional static plank options will help you diversify your workouts and increase the load.
1. Plank on all fours
2. Reverse plank
3. Reverse plank with bent legs
4. Side arm plank