The plank is one of the most effective and famous exercises for abs and a slim figure. In the sports community, it is considered a mandatory part of training, both during competitive preparation and to maintain shape.
We suggest you figure out how the plank exercise works, how to do it correctly without leaving home and gain a beautiful harmonious figure.
- Quick navigation through the article:
- The effectiveness of the plank exercise
- The benefits and possible harms of exercise
- What muscles are involved in the exercise?
- How to do a plank correctly (photo diagram for a month)
- Exercise frequency and schedule for 30 days
- How to do a side plank
- Body correction with a plank
- Who should not do the plank?
- Reviews
Benefits and possible harms of plank exercises for 30 days
Having received advice from a sports trainer about the principles of this training, we learned that the plank is an exercise whose main benefit lies in the load on the spine. Possible harm to human health can only occur in case of improper execution or individual contraindications.
In most cases, this exercise is a good prevention for the development of back and joint problems. If you have pain in the back, then using this method you can significantly improve the condition of the muscles of the vertebral part of the body.
Statistical load has a beneficial effect on the cardiovascular system. The plank stance puts stress on even the deepest muscles, which allows you to tighten your body without much effort and make it more flexible.
If we compare the positive and negative aspects of training, then there are certainly more of the former. By performing the exercise correctly, after 2-3 weeks you can be convinced of the improvement of the body.
If you regularly practice keeping your back straight, it will become a habit. As a result, you are guaranteed a straight and beautiful posture.
What muscles work in the plank exercise?
The plank involves almost the entire body. This is an excellent choice for strengthening the abs, buttocks, deltoids, serratus muscles, neck and many others. The maximum load falls on the core muscles. It is this muscle group that plays the role of stabilizer of the spine, pelvis and hips.
A short list of active muscles:
- rectus abdominis muscle;
- oblique abdominal muscle;
- transverse muscle;
- gluteus maximus muscle;
- rectus and traction muscles of the thighs.
For those who want to have a beautiful thin waist, it should be noted that it is the abdominal muscles that are responsible for the relief and twisting of the body. It is with them that almost all movements begin, so their role cannot be overestimated.
The tone of the core muscles maintains posture and protects the back from possible injuries . In addition to aesthetic beauty, pumped muscles allow you to increase all strength indicators. As you gain experience, you will be able to extend your class time.
As one of the most useful exercises for strengthening the spine, the plank is one of the least dangerous types of strength techniques for strengthening the spine.
Photos of people before and after regular exercise show the impressive effect of changes in slimness and stature in both men and women.
Benefit
Due to the fact that all muscle groups are loaded, blood flow accelerates, organs and their systems are saturated with oxygen, and the overall tone of the body increases significantly. This is where the benefits of the “Reverse Plank” exercise come into play. If you do it regularly, you can achieve good success. Thanks to the exercise you can:
- reduce the thickness of the fat layer in one of the most problematic areas - the lower abdomen;
- strengthen the upper abs, muscles of the upper limbs;
- improve body flexibility;
- increase the tone of the spinal muscles;
- maintain correct posture.
In general, the “Reverse Plank” exercise makes it possible to get rid of excess weight, stop pathological changes that cause severe pain in the lumbar area, and also correct posture.
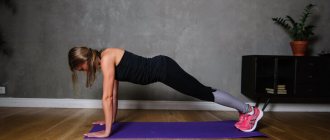
How to do the plank correctly and photo diagram for the month
Several methods of implementation are practiced, however, it is advisable to start with a classic base. Since the exercise is performed statically, it is important to take the correct position and try to keep it unchanged throughout the entire approach.
- Lie on your stomach and place your arms at right angles or rest on your elbows. This will reduce the stress on your joints.
- Keep your legs straight , resting only on your toes. Keep your feet together.
- The body should form a straight line without bending in the lumbar and pelvic areas. In the correct position, the buttocks will be tense. This activates the core muscles.
- Pull in and tighten your stomach . Keep it in this position until the end of the approach time.
It is important to keep your entire body tense to properly distribute the load and make your workout productive.
To increase the intensity, you can change the position of your arms or alternate leg raises. Such actions will make training in the plank pose more effective. Exercise, how to do basic approaches correctly, how long the training takes - this is only a small part of the useful information. Next, let's look at the standard execution scheme.
The program for beginners involves a stand of 30 seconds. To begin with, try to complete the basic exercise in a minimum amount of time. In the future, increase it to 2 minutes. If you do 3-4 approaches, then 1 minute is enough.
Varieties
The plank has several variations, but the simplest is considered to be the straight arm stand. For experienced athletes, there are more complex exercises.
On straight arms
- In the stance, the palms are strictly under the shoulders, and the body is straightened in a straight line.
- The back should be as straight as possible.
- The abs are tense.
- And don’t stick out your buttocks.
- The chest is placed between the shoulders without arching.
- The emphasis is on the fingers, the gaze is directed to the floor, the knees are straight.
From a straight supporting hand
- This is a slightly different variation of the side plank, but the lower arm is straightened.
- There should be no deflections, the body is kept level to evenly distribute the load.
Side plank
- The body is in one line on its side, the abdominal muscles are tense, the upper arm is placed on the belt or extended, and the lower arm is bent at the elbow.
- The legs should be one on top of the other or one should be pushed forward a little.
- Exercise strengthens the internal muscles of the abdomen, thighs and buttocks.
From the elbow
- The body position is the same as in the classic version, but the hands are placed on the forearms, and not on the palms.
- The elbows are located under the shoulders, the body is straight, the stomach does not sag.
Reverse or inverted plank
- While sitting on the floor, you need to straighten your legs and put your palms back, resting them on the surface behind your back.
- The pelvis rises, focusing on straight arms and heels.
- The body should form a straight line above the floor.
- The training is performed dynamically.
Exercise frequency and schedule for 30 days
The abdominal muscles love static load. Since they are almost constantly involved in work, they are quite easy to train. In the case of strength training, it is recommended to limit training time. But the plank is an exercise for 30 days of the month.
Even a few minutes in the position will significantly strengthen your torso muscles. Aim to do the exercise for at least 5 minutes a day. This time is enough to transform. The main thing is to follow the correct technique.
It is clearly visible that every day the approach time increases noticeably. The main thing is to follow the method and not give up. After 2-3 weeks, the plank exercise will be much easier for you. A photo diagram for the month will help you navigate and take breaks correctly during classes.
Feedback and results of the exercise
I started doing planks after giving birth, along with diet and serious training. The body became more toned and sculpted, about 7 kg were lost in a month! I fell in love with the plank, it became my favorite workout. Grade:
Lily
During pregnancy I gained about 20 kg and realized that I needed to lose it. I performed a set of exercises, the main ones of which were dumbbells and a plank. I worked out quite hard, eight times, eight sets, 3 times a week, plus proper nutrition. The result is minus 15 kg in two months, a sculpted, beautiful body. I didn’t even think it would work out so well. The main thing is not to allow yourself to relax, otherwise all the work on the body will be in vain. Grade:
Ksenia
I started doing planks because it seemed easy and not time-consuming, and this was confirmed. Gradually increased the load from 20 sec. up to 1.5-2 minutes, the body tightened slightly, a feeling of lightness appeared in the muscles. Of course, you shouldn’t expect colossal results, but I’m very pleased with the find for maintaining physical fitness. Grade:
Elena
I didn't like the bar. I prefer to see the result after a training cycle (targetedly pumping up the buttocks, arms, abs), rather than imperceptible strengthening of individual muscles. It’s suitable as an easy exercise for coordination, but it’s not worth basing your training on an advertised “sports trend” - you, like me, will be disappointed. Grade:
Alexander
I've been doing planks for 1-2 minutes every morning for five years. You shouldn’t expect the effect of a super-toned body from it - it’s more likely to prevent loss of skin tone and strengthen muscles. Grade:
Evgeniya
After giving birth, I gained 8 kg, and I realized that I needed to lose it. I tried not to eat after 18.00, I tried to twist a 2.5 kg hoop (for more than one month!) - nothing helped, I didn’t lose a centimeter from my waist. Then I came across a bar. At first, standing even for 10 seconds was terrible torture for me - my weak arms were shaking, like my whole body. Gradually brought it up to 1-1.5 minutes. In 3.5 months, I lost a couple of kilos, my body became leaner, more toned, and I began to look at my reflection in the mirror without shame or embarrassment. I definitely plan to continue. Grade:
Catherine
In 2.5 months of doing the plank I lost 8 kg! I watch how people, doing 20 seconds a day, are surprised at the lack of results. Every few days I increase the time by 20 seconds. or just stand there as long as I can hold out. Now the maximum time is 5.5 minutes, and I think that this is far from the limit! The most important thing is to give your all during the plank, and not think that in 20-30 seconds you will lose 5 kg per month. Grade:
Valentina
How to do a side plank
The side plank is considered a relatively difficult option. The exercise (before and after photos as an example) is most effective for correcting the sides. The fewer support points, the more the load on the abdominal muscles and inner thighs increases.
Take your starting position on your right side, resting on your elbow. Place your left hand on top of your thigh. Then tighten your abs and lift your body off the floor. This way you will support your weight on one hand. It is necessary to maintain balance by resting on your forearm and foot. The duration of the approach should be at least 10–15 seconds. Next, do reps on the other side.
The buttocks should be tense and fixed in position throughout the entire approach. Hips and feet must be kept together. This reduces the stress on your knee joints and increases the overall benefits of the exercise.
Plank technique
When performing a plank for the back, its muscles are strengthened, and in general the whole body benefits. If you approach the implementation process irresponsibly, you may not only not get the desired benefits, but also cause significant harm to your health.
In this case, it is important to take the correct pose to further perform the plank. Otherwise, you may experience muscle pain
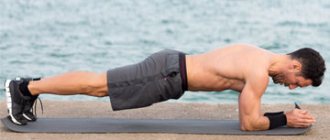
Classic plank
For the classic plank you will need to do the following:
- Lie on your stomach.
- Raise your upper body.
- Stand on your hands, first bending your elbows to form a 90-degree angle.
- Close your hands into a fist.
- Raise your head and look straight.
- Pull your feet towards you and lean on them.
- After this, you should tense your abs and lift your body.
- The position taken should resemble a single line along the entire length of the body.
For the first time, 30 seconds will be enough.
Advice! The classic plank is great for beginners. If done correctly, you can not be afraid of causing harm to your health.
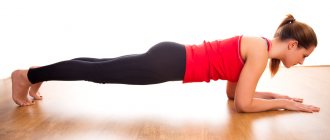
Elbow plank
Elbow planks are beneficial if done correctly. In many ways, this exercise resembles the classical technique, but there are some nuances. To avoid mistakes, you should adhere to the following recommendations:
- You need to lie down and lean on your forearms.
- Elbows shoulder-width apart.
- Hands should be clasped or parallel to each other.
- The body above the floor surface must be perfectly straight.
- Shoulders relaxed. Breathing is free.
If you feel trembling in the body, burning in the muscles, or pain and cramps, then you should immediately stop doing the exercise.
Side plank
When performing the plank correctly, the following muscle groups should additionally be involved in the work:
- back;
- shoulders;
- breast;
- legs.
Necessary:
- Lie on your side.
- The legs should be kept one in front of the other, as if walking, but lying down.
- Raise your upper body.
- Lean on your arm, bent at the elbow.
- Lift your pelvis off the floor, while you only need to lean on your feet and elbow.
- Place your other hand on your belt.
This position must be held for 30 seconds.
Plank with raised leg
When performing this type of plank, it is worth considering that the area of support will be significantly reduced, as a result of which much more load will be placed on the abdominal muscles. This option is ideal for those who want to lose weight around the waist:
- Take a classic plank pose.
- The leg is raised up - above shoulder level, while the position of the body remains the same.
- The toes of the raised foot should be pulled towards you.
You should stay in this position for up to 40 seconds, then change legs and repeat the exercise again.
Reverse plank
The reverse plank exercise brings health benefits and helps strengthen muscles. This pose can be compared to the classic plank, only upside down.
To perform the reverse plank you will need:
- Take a sitting position.
- Straighten your legs and back.
- Place your palms on the floor.
- Hands shoulder width apart.
- Buttocks raised.
- The body forms a straight line.
For beginners, it is worth holding the pose for 30 seconds, for more experienced ones – 1 minute.
Attention! As an additional load, you can put a small weight on your chest
Plank on fitball
The plank on a fitball should be performed after the classic exercise has been mastered. In this case, the most important thing is to maintain balance on the ball and not retract your neck:
- Take the classic plank pose, only in this case the elbows should be on the ball.
- Straighten your knees.
- Fix the position for up to 5 seconds.
- Lower your knees, lightly touching the floor.
- Take the starting position.
We recommend reading: What are the benefits of henna for hair, how long to keep it on and how to rinse it off
It is worth repeating from 7 to 15 times, making 3 approaches.
Body correction with a plank
The practice of many women proves that using a plank can correct your figure and get rid of unwanted centimeters. There are proven effective methods on how to do the plank exercise correctly to lose weight.
The best way to make training useful for reducing volume is to alternate types of planks. By performing approaches with a minimum of rest breaks, you can achieve visible results in the shortest possible time. To lose belly fat, use the classic exercise with emphasis on your forearms. Try to hold on for at least 30 seconds.
For those wishing to reduce their waist, a side plank with torso tilts is a good option. When performing the workout on your side, you do not place your free hand on your hip, as described above. As you inhale, you need to raise your hand up, and as you exhale, smoothly turn your body and lower your hand. Then, while inhaling, take the starting position. The program consists of 10-12 repetitions on each side.
It is recommended to take short breaks and increase the load using light dumbbells.
For those who do not have the opportunity to go to the gym, the plank is the ideal solution. Just look at real examples of the results the plank exercise gives (photos before and after).
Women who methodically do this type of training experience the first results within 20–30 days. To achieve the goal you do not need to follow a special diet.
Who should not do the plank?
The plank is an almost harmless universal exercise. However, it has its limitations, like any physical activity. During pregnancy, you should not perform this exercise, as it can harm the baby. After giving birth, it is recommended to start training no earlier than a month later.
Absolute contraindications:
- chronic diseases during exacerbation;
- inflammation of internal organs;
- high blood pressure;
- spinal hernia;
- tunnel syndrome.
If you have a spinal injury, you should begin training with extreme caution or limit yourself to minimal load. Each case is individual, but it is better to consult a specialist. Listen to your body and seek help if necessary.
Physical training is a great way to get your body in good shape and make your figure beautiful. With minimal costs you are guaranteed to get maximum results.