What muscles work in the exercise
Deadlift with a kettlebell is a basic multi-joint exercise that involves about 70% of the muscles of the entire human body (up to 400 muscles).
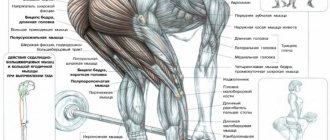
Designed to develop the muscles of the back and legs . But in reality, almost all major muscle groups are loaded:
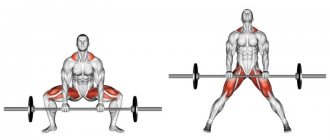
- The quadriceps and hamstrings, gluteal and calf muscles are responsible for the lower phase of the movement
- The psoas, latissimus and trapezius muscles work actively in the second phase (reaching). Here the main load falls on the lower back
- The rectus abdominis muscle acts as an antagonist to the lower back, helping to stabilize the torso in an upright position
- The forearms work in a static mode, holding the kettlebell in the lowered hands
Deadlift: a great guide to one of the main exercises
We hope you know that the deadlift, along with the squat and bench press, is the basis of bodybuilding.
Deadlifts make your whole body tense - legs, back, core, shoulders, grip, abs... Among other things, it also speeds up your metabolism and works as a cardio exercise, so you can safely talk about it as bodybuilding in one movement. Below we have collected all the types of deadlifts that we know and the technique for performing them. Pay attention.
Rack
Since this is a classic deadlift, place your feet hip-width apart and your feet parallel to each other.
If your toes point in different directions, it will be more difficult to perform the upper phase of the deadlift and the load on the spine will increase.
Tip: to more accurately determine the width of the stance, hang on the bar, after a couple of seconds, jump off relaxedly and look at your heels: now there is an optimal distance between them.
Grasp the bar so that your hands do not touch your legs when performing the exercise. In this case, the distance between the hands should not be wider than the shoulders.
Advice
This grip makes it easier to bring your shoulder blades together at the top of the exercise. Tip: To prevent deadlifts from damaging your back or arm muscles, always perform them only with an overhand grip.
If necessary, use magnesium or wrist straps.
Small of the back
And now - ATTENTION! Even before the bar lifts off the floor, your lower back should be tense and slightly arched. This back position makes it easier to lift the barbell and is the safest for the spine. Tip: make sure that the angle of inclination of the body from the vertical in the starting position does not exceed 45º. At large angles, your back shouldn’t work; everything else is up to your legs.
Shoulders and back of the head
The deadlift should begin by moving the head and shoulders back. Backwards, not up or up and back! Then begin to push off the floor with your feet, AT THE SAME TIME lifting your shoulders, pelvis and knees up and back.
When deadlifting, the pelvis should not overtake the rise of the shoulders or the degree of extension of the knees. Advice: don’t be afraid if, while doing an exercise, you feel like you’re leaning backwards.
Such sensations are a marker of correct deadlift technique.
To perform this deadlift variation, stand with your feet two shoulder widths apart. Grasp the barbell at the center of the bar with a close grip and bend at the hips in the same way as during a classic deadlift. To get acquainted with the three best classic exercises for the legs and lower back, read this text.
Bend your knees and with an explosive, but not sudden movement, straightening your knees, lift your body along with the barbell. This exercise properly works the leg muscles, and when you raise the bar to waist level, it also engages the lower back muscles.
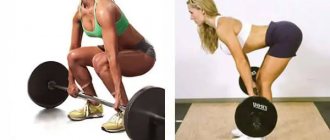
This exercise establishes a connection between the pelvic and shoulder girdles, develops a sense of balance, pumps up the buttocks and generally brings a lot of positive sensations.
Remember that you need to bend at the hip joint and slightly at the knees, but in no case at the spine. The trick with this exercise is that the non-supporting leg becomes part of the load you are working with, along with the weight.
Hold the kettlebell in one hand at hip level with your palm facing you. If you have the kettlebell in your right hand, then stand on your right leg and, pushing the straight left leg back, bend until the kettlebell touches the floor. Return to the starting position.
Hold dumbbells in front of you with your palms facing your body. Place your arms down, bend your knees slightly. Lower your palms as low as possible to the floor, then slowly return to the starting position.
The dumbbell deadlift not only works your lower and upper back, but it also lays the foundation for strength building because it engages your other posterior muscles (glutes and triceps) to improve your ability to transmit force from your hips.
You can do a classic deadlift if you want, but if you're new to lifting weights, try the straight leg deadlift (some call it a deadlift). When you don't bend your knees, your quads are locked out of the movement and all the force goes to your hamstrings.
If you're doing a classic deadlift, grab the bar with your hands shoulder-width apart, your shoulders back, and your gaze straight ahead. Be sure to keep your back straight. Keep the bar as close to your body as possible. Raise the barbell to hip level and slowly lower it into place.
Tony Gentilcore, Certified Strength and Conditioning Specialist
This is perhaps the best way to get into athletic shape for the summer. Cyclist's legs? Please. High-quality lower back and torso? Exactly.
As a result, you not only gain muscle, but also increase core stability - what you need to play beach volleyball. Well, the main trump card of this exercise is working with weights.
The worst enemies of fat, forcing more than a dozen muscles to work simultaneously, merciless calorie burners - they are always ready to make you handsome.
note
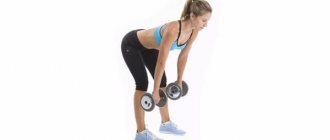
Stand straight, feet shoulder-width apart, in each hand a kettlebell of the weight you feel comfortable working with.
Brace yourself and tighten your core to maintain your balance and not fall flat during the exercise.
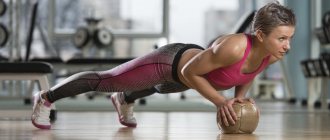
With your right leg slightly bent at the knee, lean forward, and stretch your left leg back for balance.
Important: your back should be straight, not rounded.
Bend over, lower the weights until your torso is parallel to the floor.
Pause, look at the floor and return to the starting position, feeling a pleasant tension in your buttocks.
Your task is 3-4 approaches during the workout. Is it easy for you? Grab some heavier weights!
- powerful buttocks and hamstring muscles;
- increased stability of the body and cubes - even to the beach;
- V-shaped back that looks perfect under a T-shirt;
- the ability to do the exercise anywhere - with suitcases.
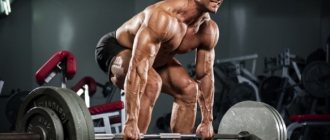
Start with a comfortable weight and add kilograms until the barbell reaches 60 kg. Do 3 sets of 10 repetitions each (5 with your right hand, 5 with your left). When performing the exercise, do not place the barbell on the floor in the lower phase, but keep it a few centimeters from the floor.
Step 1 Stand sideways to the barbell. Bend your knees and extend your arms down, as if you are about to grab a suitcase in each. The back is straight.
Step 2 Lower your shoulders, grab the middle of the bar, fix your arm in a straight position. Tighten your core, grip the bar tightly.
Important
Step 3 When lifting the barbell, do not lift your shoulders. If it starts to warp or wobble, throw it away. If you try to hold on, you risk injuring your back.
Step 4 When you start to increase the weight you lift, your grip should already be precise and confident. Use chalk, but not wrist straps (you should always be able to throw the bar if something goes wrong).
Step 5 To prevent your lower back from twisting, tense your gluteal muscles on the side of the barbell and your oblique abdominal muscles on the opposite side. What you are doing is not bending to the sides.
The benefits of this exercise will manifest themselves not only when you get ready to go on vacation and carry your girlfriend’s suitcase.
“Deadlifting with a barbell in one hand (or, as people say, a “suitcase”) literally increases the armor on your body and makes you invulnerable to external physical influences,” says Pavel Tsatsouline, a famous fitness instructor, ex-trainer of the Soviet special forces.
“On the one hand, you need to maintain balance, on the other, you need to stabilize the barbell in your hand. As a result, both core muscles and grip strength are developed. You will benefit from both in many sports and most exercises in the gym.”
If you know other types of deadlifts, write us about them in the comments - we will definitely add them to this guide.
The purpose of this exercise is mainly to concentrate the load on the back of the thigh. This option also loads the quadriceps on the leading leg no less strongly, which turns the deadlift with a kettlebell on one leg into an excellent profiling exercise not only for the back, but also for the legs.
- A weight of suitable weight is taken with both hands.
- One leg is moved back slightly.
- A slow lifting of the projectile begins while maintaining the arch of the back.
- When the body rises evenly, the secondary leg should also be measured back to maintain a right angle between it and the body.
Read more: Outdoor training program
The general rules of execution are similar to the classic deadlift technique with a kettlebell. It is always important to remember to breathe correctly. When moving up, exhale, and at the top point, take one or more breaths.
Advantages and disadvantages
The deadlift is one of the “golden three” exercises of all strength sports (the other two are squats and bench press). And, probably, the most controversial, because it has both huge advantages and the same disadvantages.
Among its undeniable advantages:
- Increases the strength level of large muscle groups - back and legs
- Suitable for gaining muscle mass throughout the body, with an emphasis on the legs, buttocks and back
- The ability to modify the technique of performing movements and redirect the load on different muscle groups
For example, if your knees bend more at the start, then most of the load goes to the quadriceps. If in the starting position the legs are almost straight, the hamstrings and glutes will work more (a variant of the Romanian deadlift).
Among the disadvantages of the exercise:
- Large compression load on the spine
The negative impact increases in proportion to the increase in burden.
- Technically difficult movement
Despite all the apparent ease, the correct execution of a deadlift with a kettlebell is full of technical nuances. To learn the movement quickly and effectively, you need the help of a trainer.
- Not suitable for beginners
In addition to the difficulty in technical execution, deadlifts with a kettlebell require a certain level of muscle tone in the back and abdomen. And also at least a minimum level of strength training.
- Limited kettlebell weight
This is a specific disadvantage of the exercise, characteristic only of the version with a kettlebell.
The fact is that the weight of this burden is standardized. These are 8, 16, 24 and 32 kg. After a short period of time, even a 32 kg weight becomes light.
To complicate the movement, an option is to use two weights at once. Or switch to the classic version with a barbell.
Technique for performing deadlifts with one kettlebell
- Place your feet hip-width apart, you can turn your toes slightly out.
- Bend over with a straight back and clasp the handle of the weight with both hands.
- Lift the weight, straighten your spine, tighten your abdominal and buttock muscles. Do not round your back throughout the exercise.
- As you inhale, perform a squat and move your pelvis back, leaving your knee joints in place. The arms are hanging freely with straight elbows. At the bottom point, touch the weights to the floor.
- As you exhale, push off with your heels and straighten your torso with your buttocks and back, while simultaneously performing kettlebell rows.
- Repeat as many times as necessary.
Important! Do not perform the movement separately, the bend and squat are performed simultaneously, just like when performing a deadlift - extension of the torso (lifting the pelvis and body) occurs simultaneously. Imagine that you are doing a squat with a barbell on your shoulders, so your back will not fall forward, taking all the load on itself.
This exercise can also be performed with two weights (one weight in each hand), the technique remains the same.
With a kettlebell or with a barbell - whichever is better
Both exercises have the same training effect in terms of muscle growth and strength. Provided that the weight of the weight is chosen correctly and the last repetitions in the approach are given with great difficulty.
The kettlebell deadlift may be your first introduction to the deadlift. As long as the movement is performed with a noticeable effort, this weight will give an increase in the result.
But once the kettlebell becomes light for 12 reps (or higher), the stimulation of muscle growth and strength with this exercise will stop.
To progress further, increase the weight. After all, the deadlift is a strength exercise that uses heavy weights.
To get further results, you will have to switch to barbell deadlifts at some point.
Here, weight is not limited and results can be improved over the years until the genetic potential is exhausted.
As for the kettlebell deadlift, you can leave it in your training if gaining muscle mass is not of interest to you.
With the help of this movement, they work to improve strength endurance (for example, in kettlebell lifting), or increase the overall functionality of the body (crossfit).
Deadlift for beginners
Deadlifts are definitely not suitable for beginners.
Before you begin to master the movement, you need to increase the tone of all the muscles of the body. And also create a muscular back corset, paying attention to the lower back and abs.
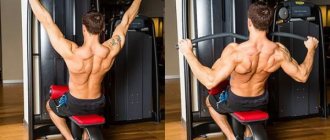
Here, performing technically accessible back exercises will help - hyperextension for the lower back, rows of upper and horizontal pulleys for the latissimus dorsi muscles.
This is the standard minimum for back development in the first months of training. After 4-6 weeks of regular strength training, overall muscle tone will increase. Only after this start mastering the deadlift.
Errors and recommendations for implementation
The most traumatic mistake when performing deadlifts with a kettlebell is rounding your back .
For beginners, this happens due to weak lumbar muscles or insufficient mobility in this part of the spine.
In this case, you need to seriously work on pumping up your lower back, using hyperextension or a boat, and spend time stretching.
In people of average fitness level, rounding of the back is observed in the last repetitions of the approach. The more fatigue accumulates in the muscles, the harder it becomes to control the technique.
It will be useful here for a more experienced athlete (or better yet, a coach) to watch you from the side. If technical errors occur, he will correct the execution.
Remember:
I do deadlifts with a straight back! To do this, move your chest forward and squeeze your shoulder blades together. This is the key to a correct and, most importantly, safe technique for the spine.
Common mistakes also include sudden, too fast movement at the start (in the bottom position). The faster the deadlift is performed, the harder it is to control your body position.
To ensure your technique doesn't suffer, do your repetitions smoothly and under control. Clearly tracking the correct position of all parts of the body when performing.
If the slow pace is too difficult for you, reduce the weight and continue practicing the movement.
Exercise technique
The technique for performing the exercise looks like this:
- Place the weight on the floor in front of you. The arm of the kettlebell should be parallel to the body. Place your feet a little wider. How wide depends on your stretch, you should not feel any discomfort in your inner thigh.
- Keep your back as straight as possible, allowing only a slight tilt forward (literally 10-15 degrees). Without bending lower, squat down and grasp the handle of the weight with both hands. Use a closed grip.
- Working your leg muscles, stand up with the dumbbells. Keep your back straight throughout the entire lift. The movement should be as explosive and fast as possible to give the kettlebell good momentum. Then your shoulders won't tire from the pulls as quickly, and you'll be able to do more reps. The same operating principle applies when performing kettlebell swings with both hands in front of you.
- When you have already fully straightened and straightened your knees, the weight should “fly” up a little more by inertia. This is what you need to take advantage of. There is no need to pull it towards your chest, you just need to continue its movement. With your shoulders slightly tense and your elbows bent, pull the weight up to about chest level. The movement is performed in much the same way as a close-grip barbell row to the chin. To place more emphasis on the shoulders rather than the trapezius, move your elbows out to the sides as you lift. At the top point, the elbow should be located above the hand.
- After this we perform the next repetition. If you're doing a CrossFit routine where you need to do as many reps as possible for time, you'll want to place the kettlebell down as sharply as possible, with your back tilted downward. If not, do the same thing, only in reverse order.